Home › Blog › Shopify Packing Slip: Customize and Automate with Zapier
Shopify Packing Slip: Customize and Automate with Zapier
Customize your Shopify packing slip without Liquid. Compare templates and apps, then automate branded PDF packing slips with Shopify, Zapier, and ShipPDF.
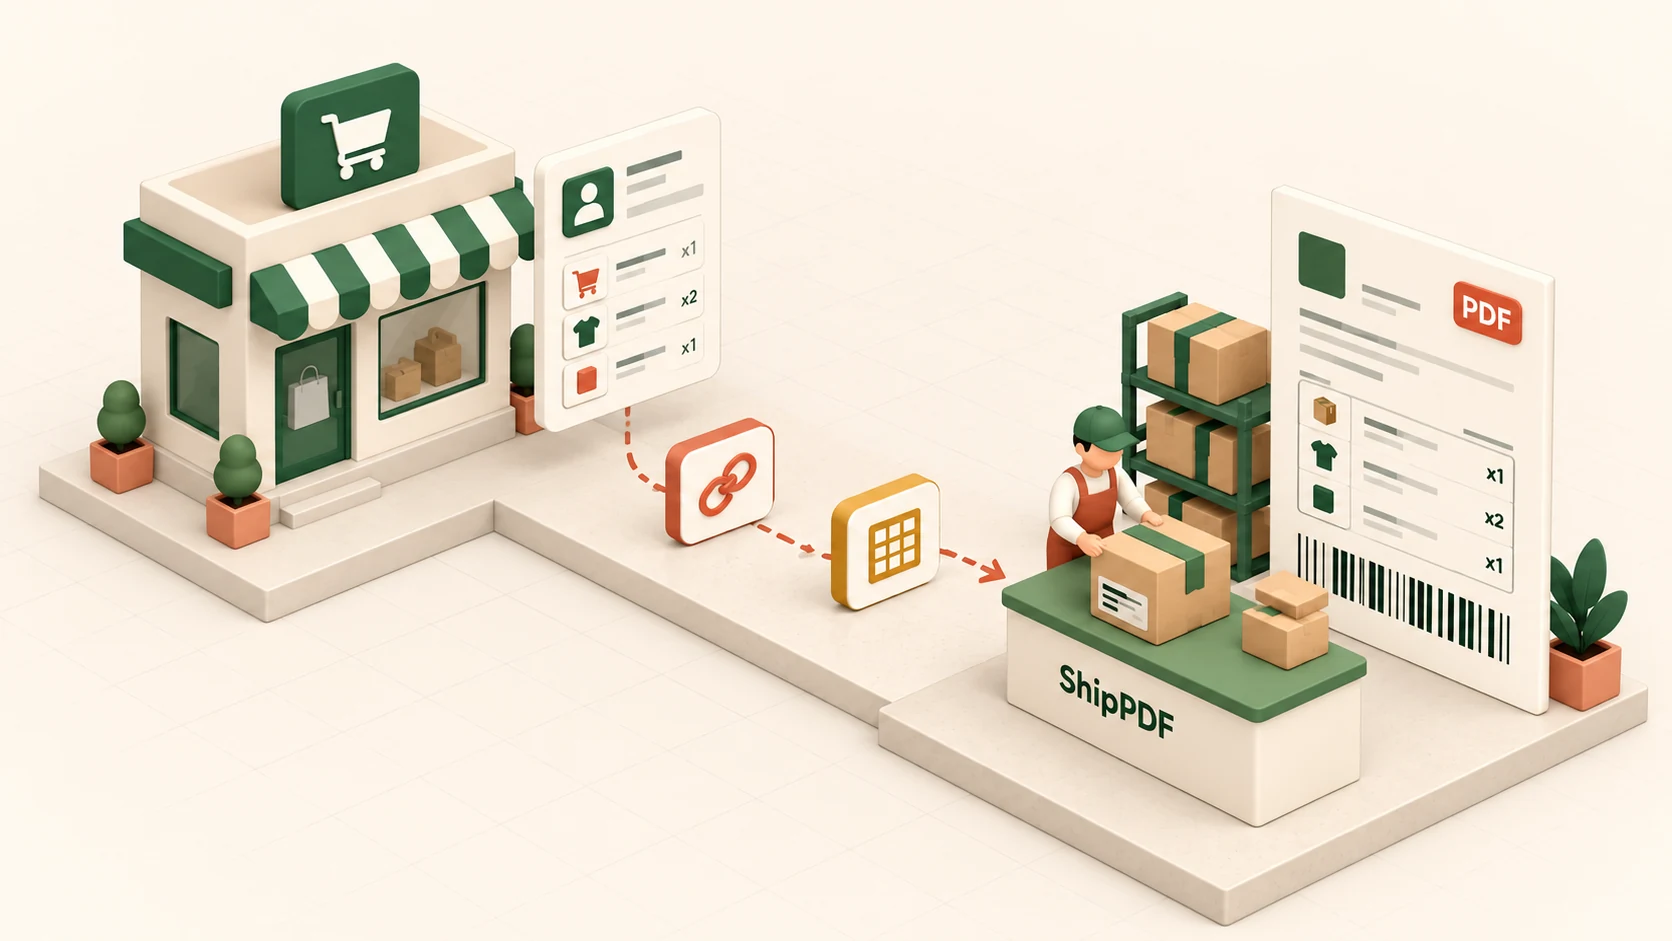
A Shopify packing slip should make a package easy to check: who it belongs to, which products are inside, and how many of each item were shipped. Making that document look like your brand should be straightforward, too.
Shopify includes packing slips, but its native template customization involves HTML, CSS, and Liquid. Moving your logo, changing a product table, or rearranging the address can turn a simple design request into a code-editing task.
You have another option: design a reusable packing slip visually in ShipPDF, use Zapier to pass Shopify order data into it, and generate a branded PDF. The layout can be maintained without editing Liquid. The initial automation still requires field mapping and an API request; this guide explains that setup.
The workflow below is intended for stores that ship an entire eligible order in one package. Split shipments need shipment-specific data, which we cover separately. Generating a PDF also does not send it to a physical printer by itself.
In this guide
- What belongs on a packing slip
- Print or customize Shopify’s native packing slip
- Compare native templates, apps, and Zapier
- Build the Shopify–Zapier workflow
- Handle partial shipments
- Troubleshooting
- Frequently asked questions
What belongs on a Shopify packing slip?
Need a blank form or a completed example first? Our packing slip guide and free PDF template covers the basics and includes a fillable download for manual shipments.
A packing slip lists the contents of a package. It helps the packing team check the shipment and gives the recipient a record to compare against what arrived.
For a useful custom packing slip template, start with:
- Store name and logo.
- Order number, plus a shipment reference when an order has multiple shipments.
- Recipient name and shipping address.
- Product name, variant, SKU, and quantity shipped for each item.
- Customer-facing instructions, a support contact, or a returns link.
Keep the document focused on receiving and checking goods. An invoice records charges and payment details; a shipping label carries carrier and routing information. A packing slip serves a different purpose from either of those. For gifts, a layout without prices often makes more sense.
Design for the packing bench as well as the customer. Use readable quantities, enough space for long product names, and a layout that still works in black and white. Print a sample at the actual paper size before adopting the template.
How to print or customize Shopify’s native packing slip
In Shopify admin, open Orders, select an order, then choose Print → Print packing slips. For bulk printing, select multiple orders first. To change the native template, go to Settings → Shipping and delivery → Documents → Packing slip template. Shopify provides a way to restore its default template. See Shopify’s printing and editing instructions.
The challenge is maintaining the design. HTML controls the structure, CSS styles it, and Liquid inserts order values and repeats products. A merchant who simply wants a more readable quantity column now has to understand how those layers fit together.
Shopify’s packing slip variable reference
documents fields such as order.name, shipping_address, and
line_items_in_shipment. Within shipment items, shipping_quantity represents
the quantity being fulfilled, while quantity represents the total product
quantity. These Liquid variables belong to Shopify’s template environment;
they are not field names you can assume Zapier will return.
If the default document meets your needs, keep using it. A separate PDF workflow becomes useful when you want to manage the layout visually or send documents to other systems automatically.
Native Shopify packing slip, app, or Zapier?
| Approach | Good fit | What to consider |
|---|---|---|
| Shopify’s native packing slip | Printing documents from your existing order workflow | Custom layout changes involve template code. |
| A Shopify app such as Order Printer Pro | Keeping document work inside Shopify | Compare its template editing, printing, and delivery features with your needs. |
| ShipPDF with Zapier | Maintaining a visual PDF template and connecting it to other apps | You configure data mapping, API authentication, and document delivery. |
Order Printer Pro advertises packing slips, customizable templates, and bulk printing and export. It is a reasonable option to evaluate for a Shopify-centered workflow. This guide is not a hands-on review of that app.
Choose the Zapier route when the document is part of a larger process: archive each PDF, notify your packing team, or use the same document platform for orders from several channels. It generates a separate PDF; it does not replace the template behind Shopify’s native Print packing slips button.
How to create a custom Shopify packing slip with Zapier
The proposed integration uses Shopify’s Zapier trigger and ShipPDF’s REST API. It does not depend on a dedicated ShipPDF Zapier app.
Zap 1: Shopify order → eligibility checks → map data → ShipPDF generation request
Zap 2: PDF completion callback → verify document → save PDF → notify packing team
1. Prepare your accounts and a representative order
You need a Shopify store, a paid Zapier plan that supports the apps in this workflow, a ShipPDF account, and a destination for the PDF. Shopify is a premium app on Zapier. Check the current Shopify integration listing and your plan before building.
Use a sample order with at least two different products, a variant, a quantity above one, and a complete shipping address. A one-item sample can hide a broken product mapping.
Decide when an order is eligible. Payment alone does not confirm stock availability, remove fulfillment holds, or decide which warehouse will pack it. If your team prepares orders after a separate approval step, trigger document generation at that point instead.
2. Design and publish the packing slip template
You can create your packing slip template in two ways:
- Build it manually in the visual editor. Arrange the layout, add your branding, and connect the elements to your order data.
- Ask your favorite LLM assistant to help. Connect it to ShipPDF through ShipPDF’s MCP support, then describe the layout and fields you need. Your assistant can help create the template, which you can review and adjust in the editor before publishing.
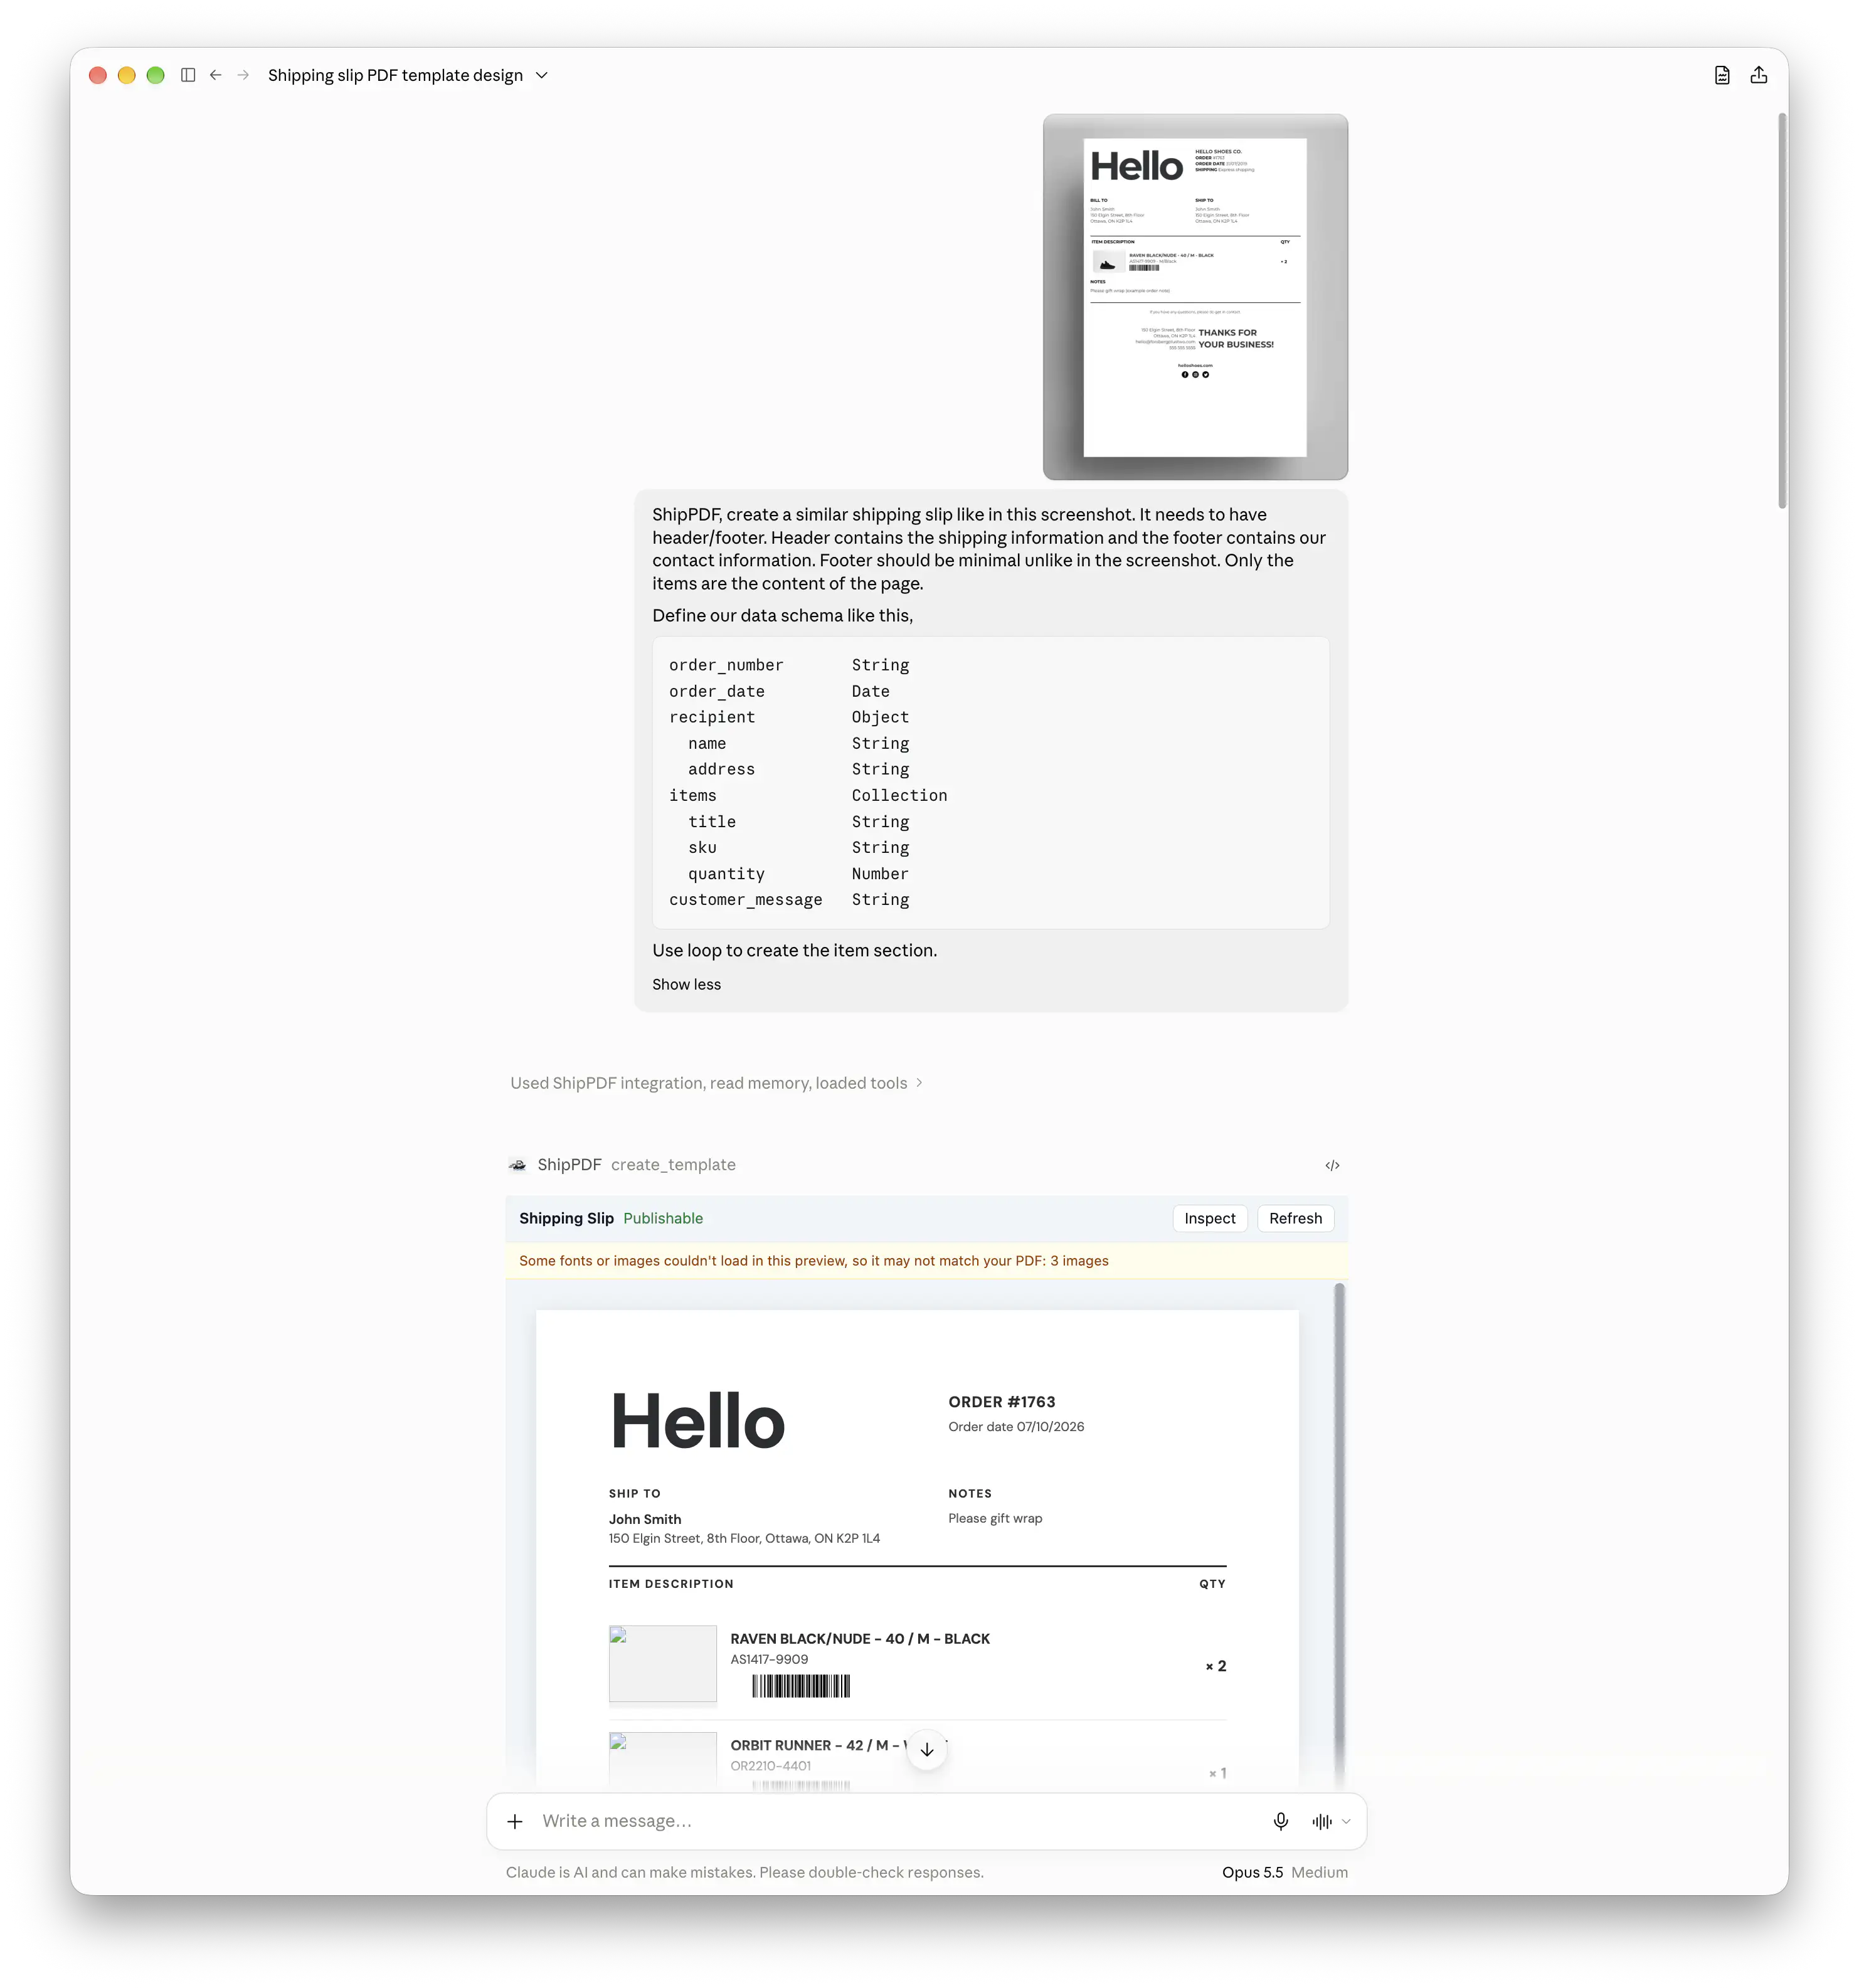
In ShipPDF, create a template with a header, a recipient block, an item list, and a footer. Add your logo and choose the page size you actually print on. The screenshots below show our Shipping Slip draft, with product images and SKU barcodes inside a repeating item layout. You can also use a Table for a more compact document.
Define a data schema around your document. For example:
order_number       String
order_date         Date
recipient          Object
  name             String
  address          String
items              Collection
  title            String
  sku              String
  quantity         Number
  image_url        String
customer_message   String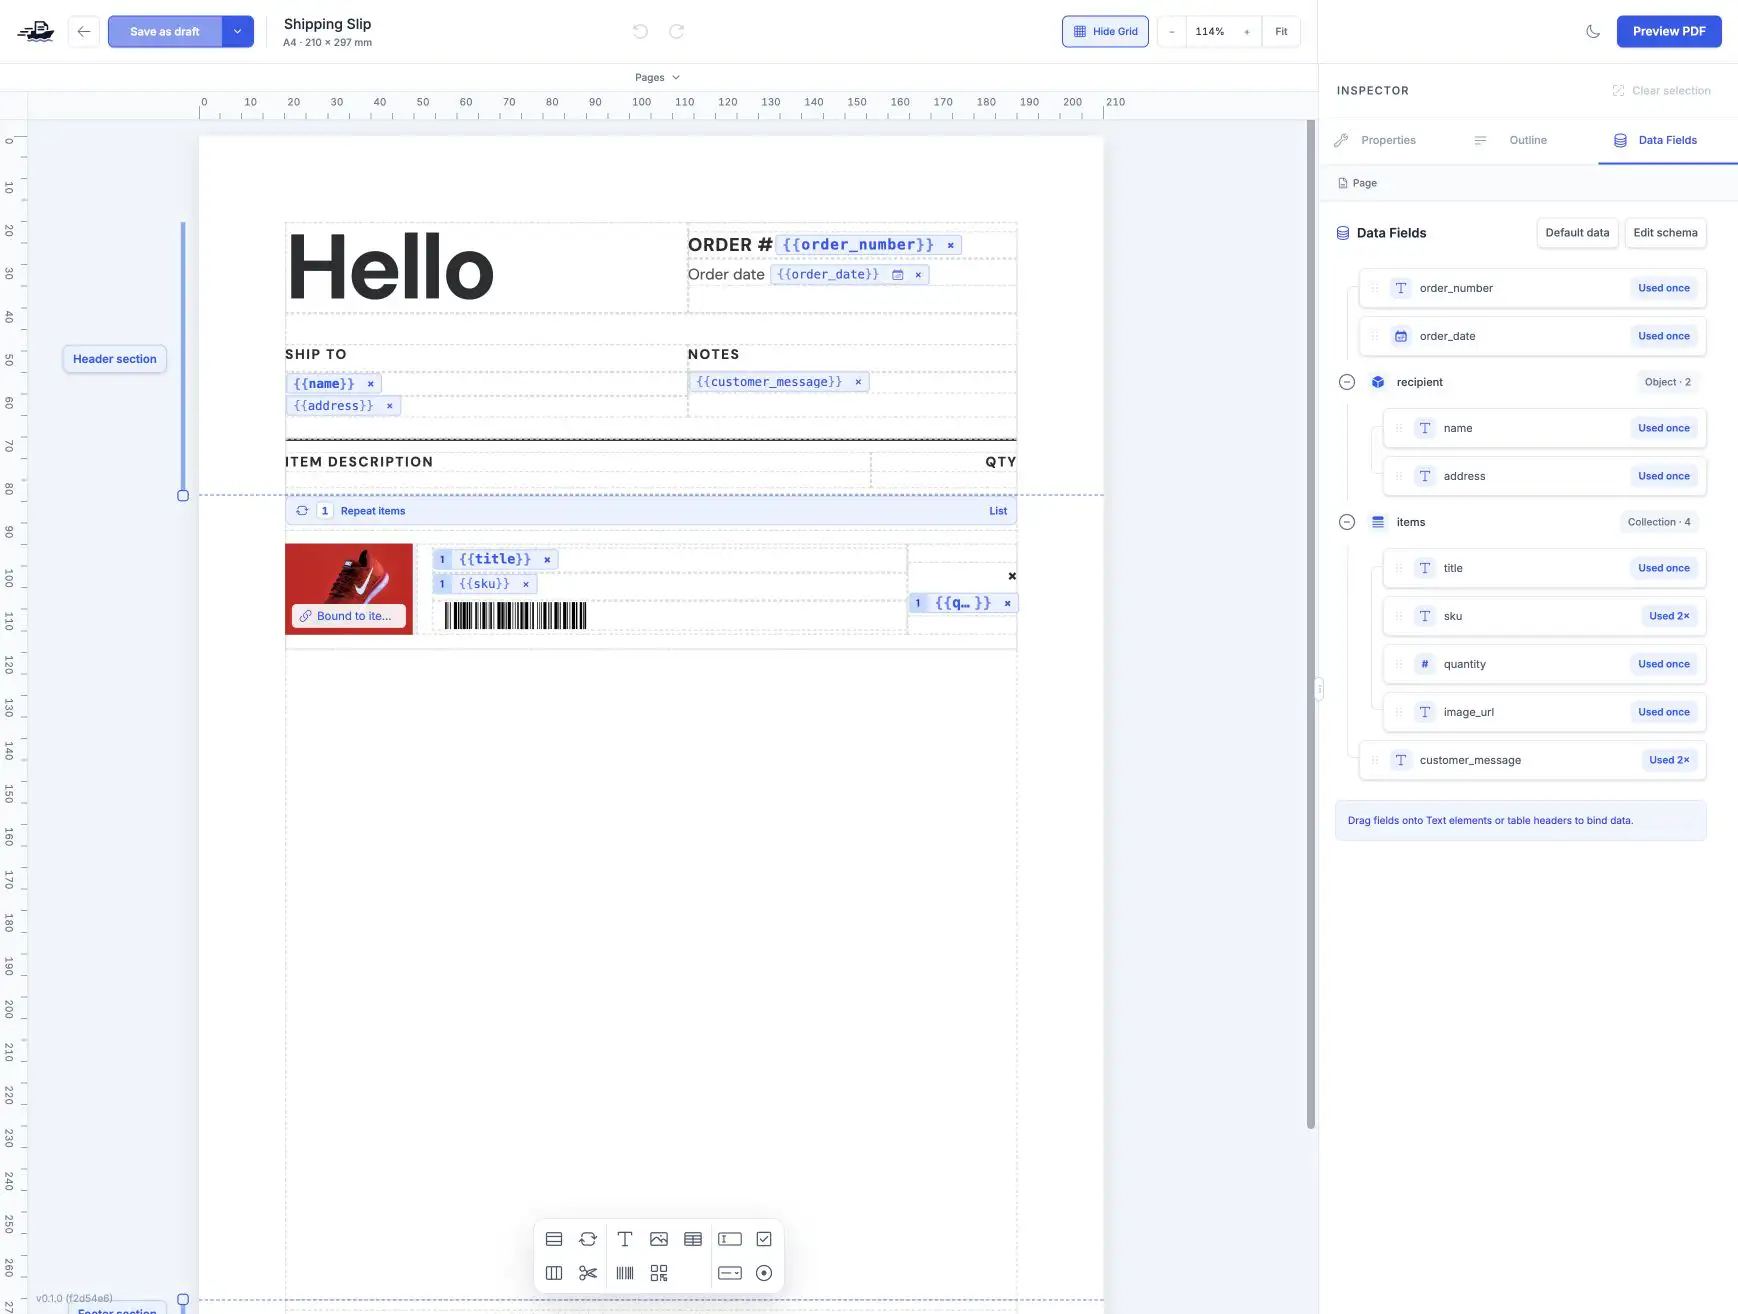
Bind the recipient text to recipient.name and recipient.address. Set a Loop’s
source to the items Collection, then bind the elements inside it to title,
sku, quantity, and image_url. The SKU can drive both text and a Barcode
element. A Table can use the same Collection if you prefer columns.
Static store details and the logo can stay in the template instead of being
sent with every order.
See data field bindings and Data Schema and Default Data for the editor steps. Open Default data to test several products, quantities above one, and a complete address. Preview with a long address and enough items to create another page, then publish the template and copy its template ID.
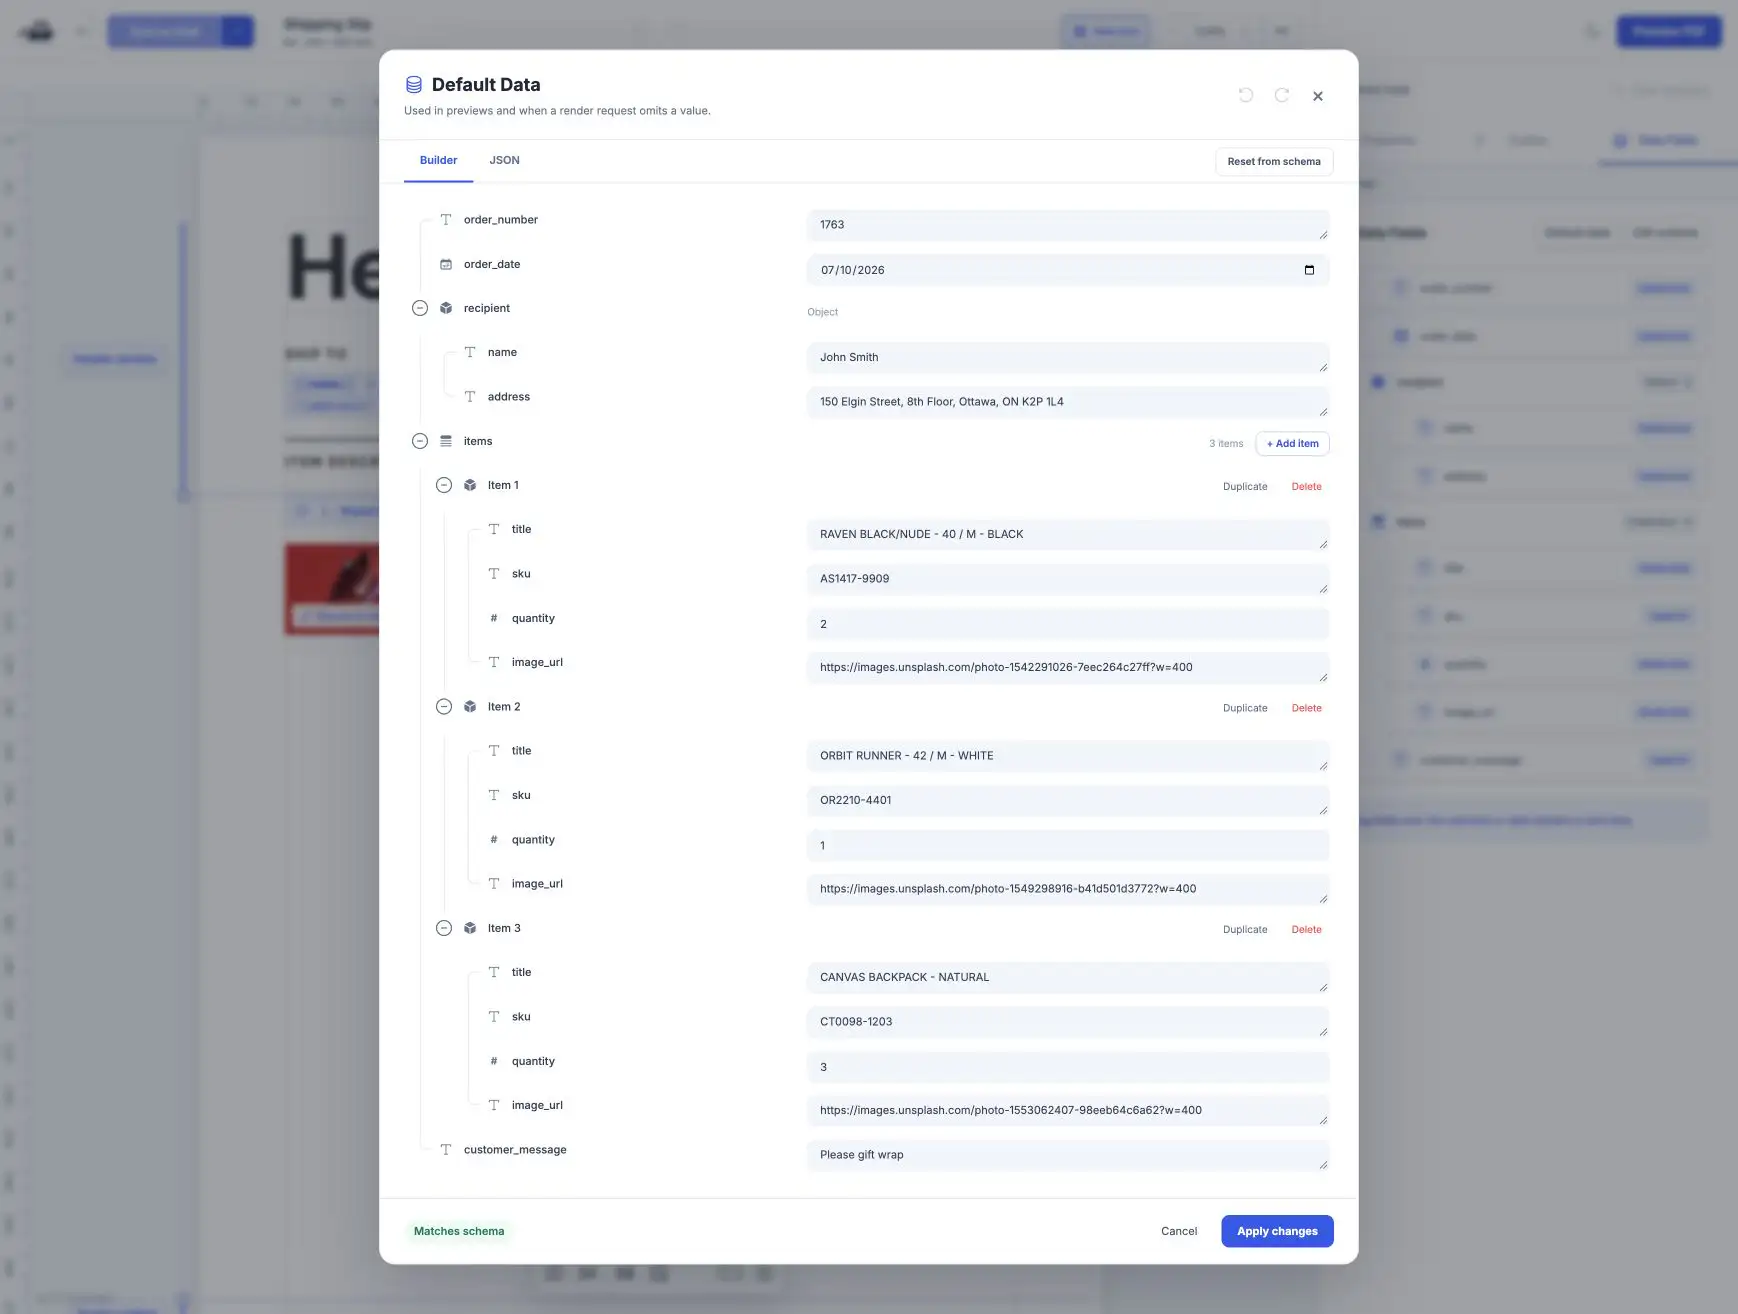
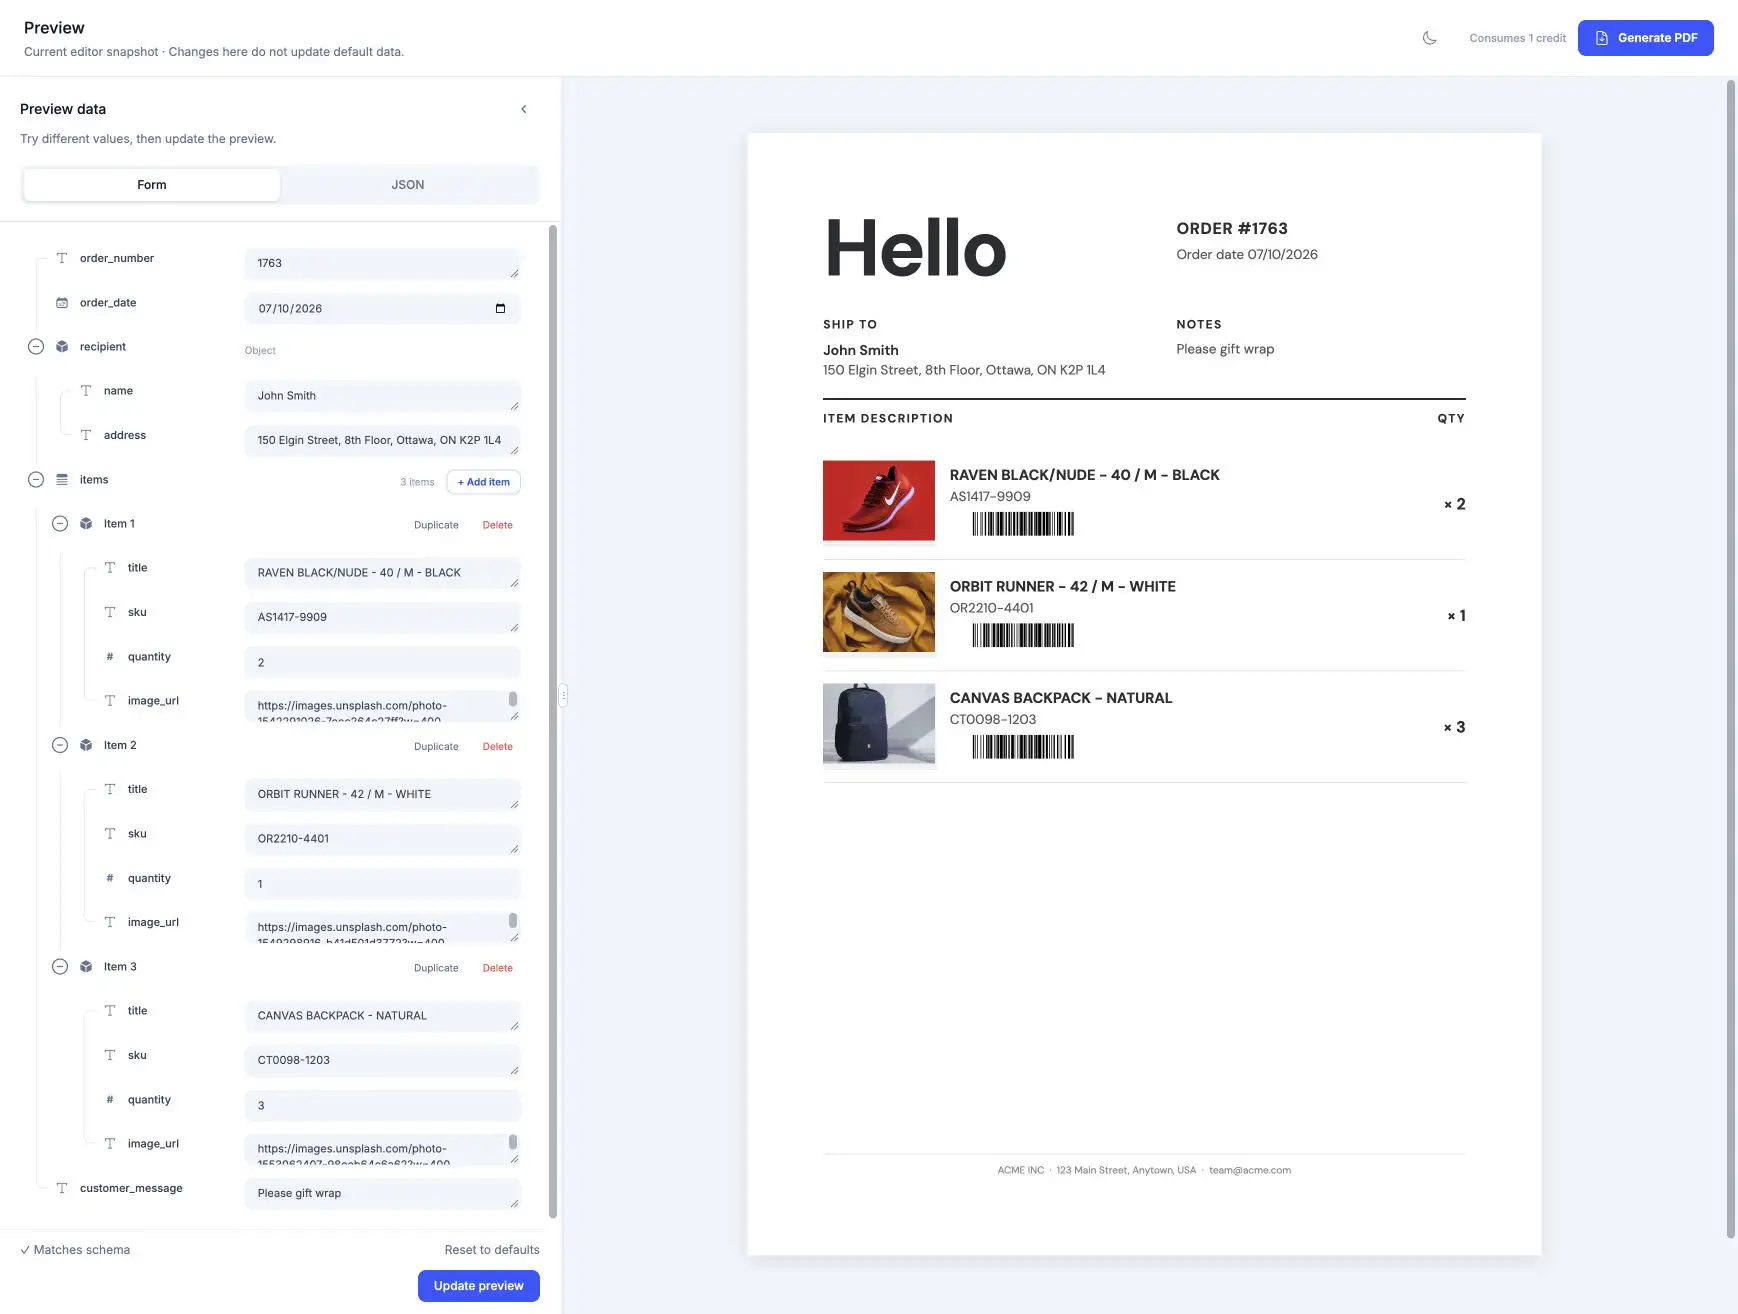
Avoid realistic placeholder customers in production defaults. A missing address should stop the workflow for review rather than produce a convincing slip for the wrong recipient.
3. Choose the Shopify trigger and check eligibility
For the full-order example, select Shopify → New Paid Order in Zapier, connect the store, and load your sample. Zapier lists line item support for this trigger in its Shopify troubleshooting documentation.
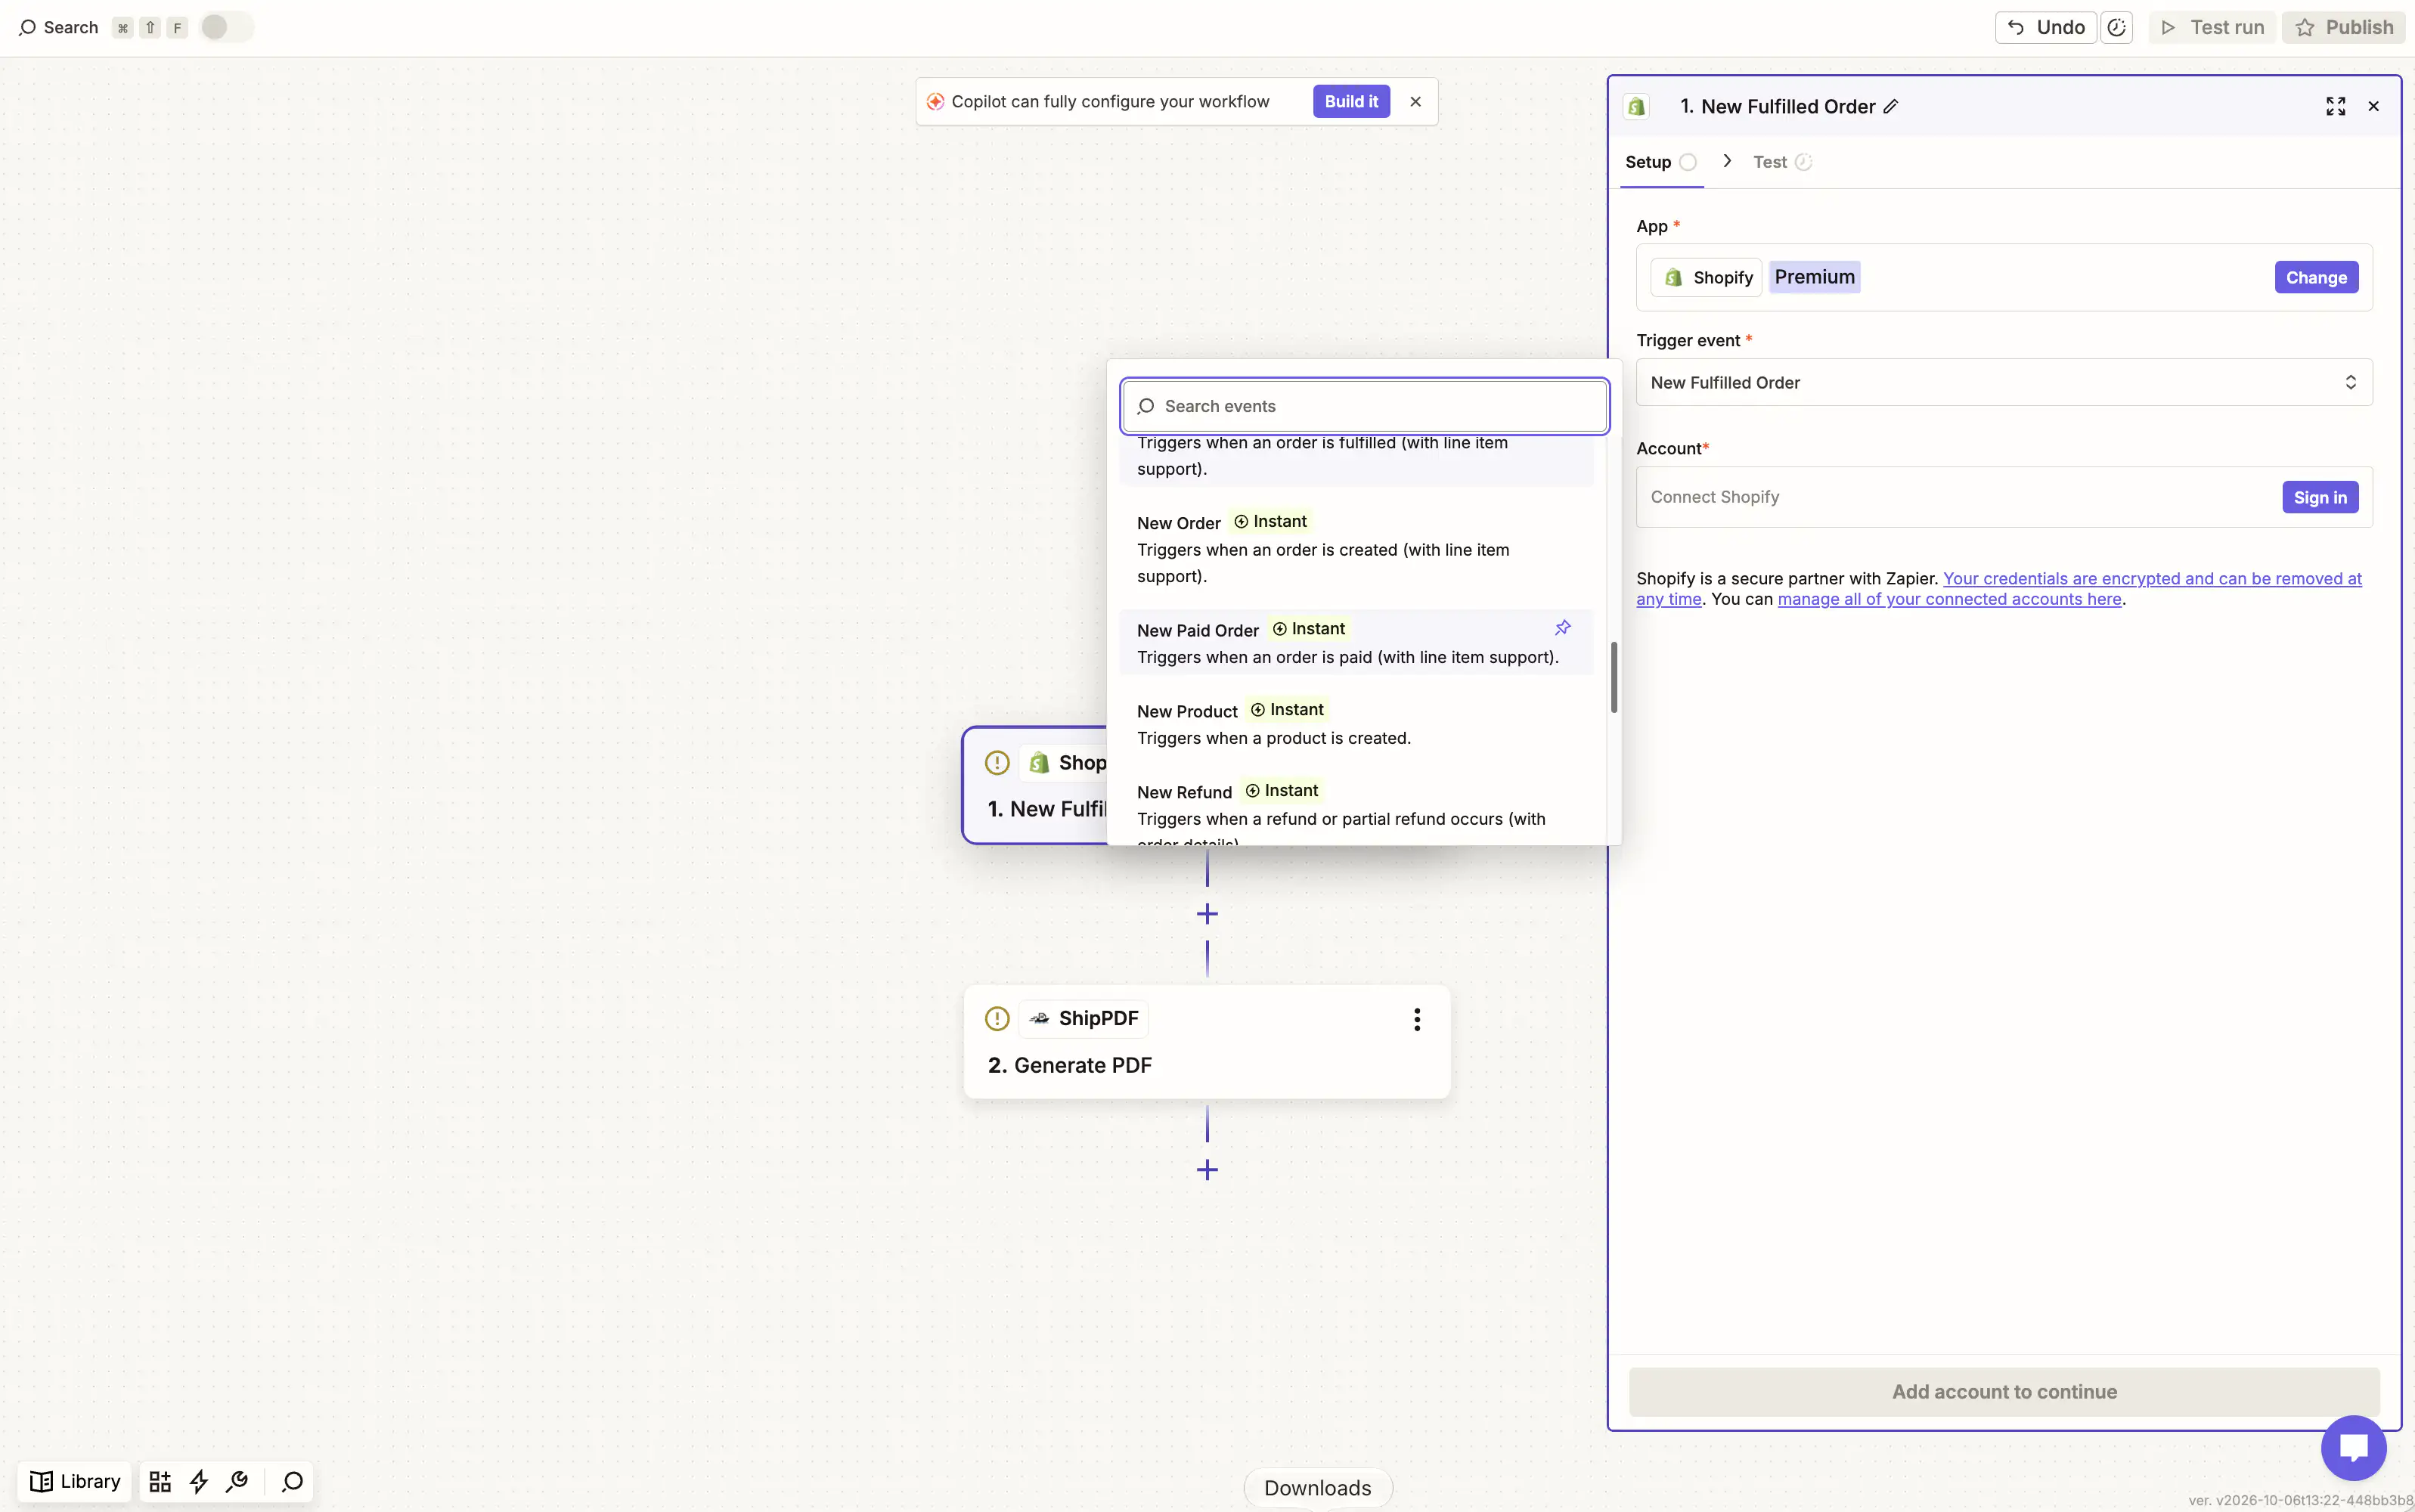
Add checks for your actual shipping rules. At minimum, require a shipping address and physical items, and exclude orders that should not be packed yet. If all items will not ship together, use the shipment approach below instead.
Inspect the trigger output before mapping it. If it lacks a required value, evaluate a Shopify Get Order by ID step and inspect that result, too. Do not assume an order lookup supplies every custom field or shipment detail.
4. Map Shopify data into the template
Your template schema is the contract. Zapier’s field labels can differ from the example names below; choose values from the real test output.
| Template field | Value to select or prepare |
|---|---|
order_number |
Customer-facing order name or number, rather than the internal ID |
order_date |
Order creation date in the schema’s accepted format |
recipient.name |
Shipping recipient’s name |
recipient.address |
Shipping address assembled with sensible line breaks |
items[].title |
Product title and useful variant details |
items[].sku |
SKU for the corresponding product |
items[].quantity |
Quantity for that product in this package |
items[].image_url |
Product image URL if the layout includes an image |
customer_message |
Approved customer-facing text |
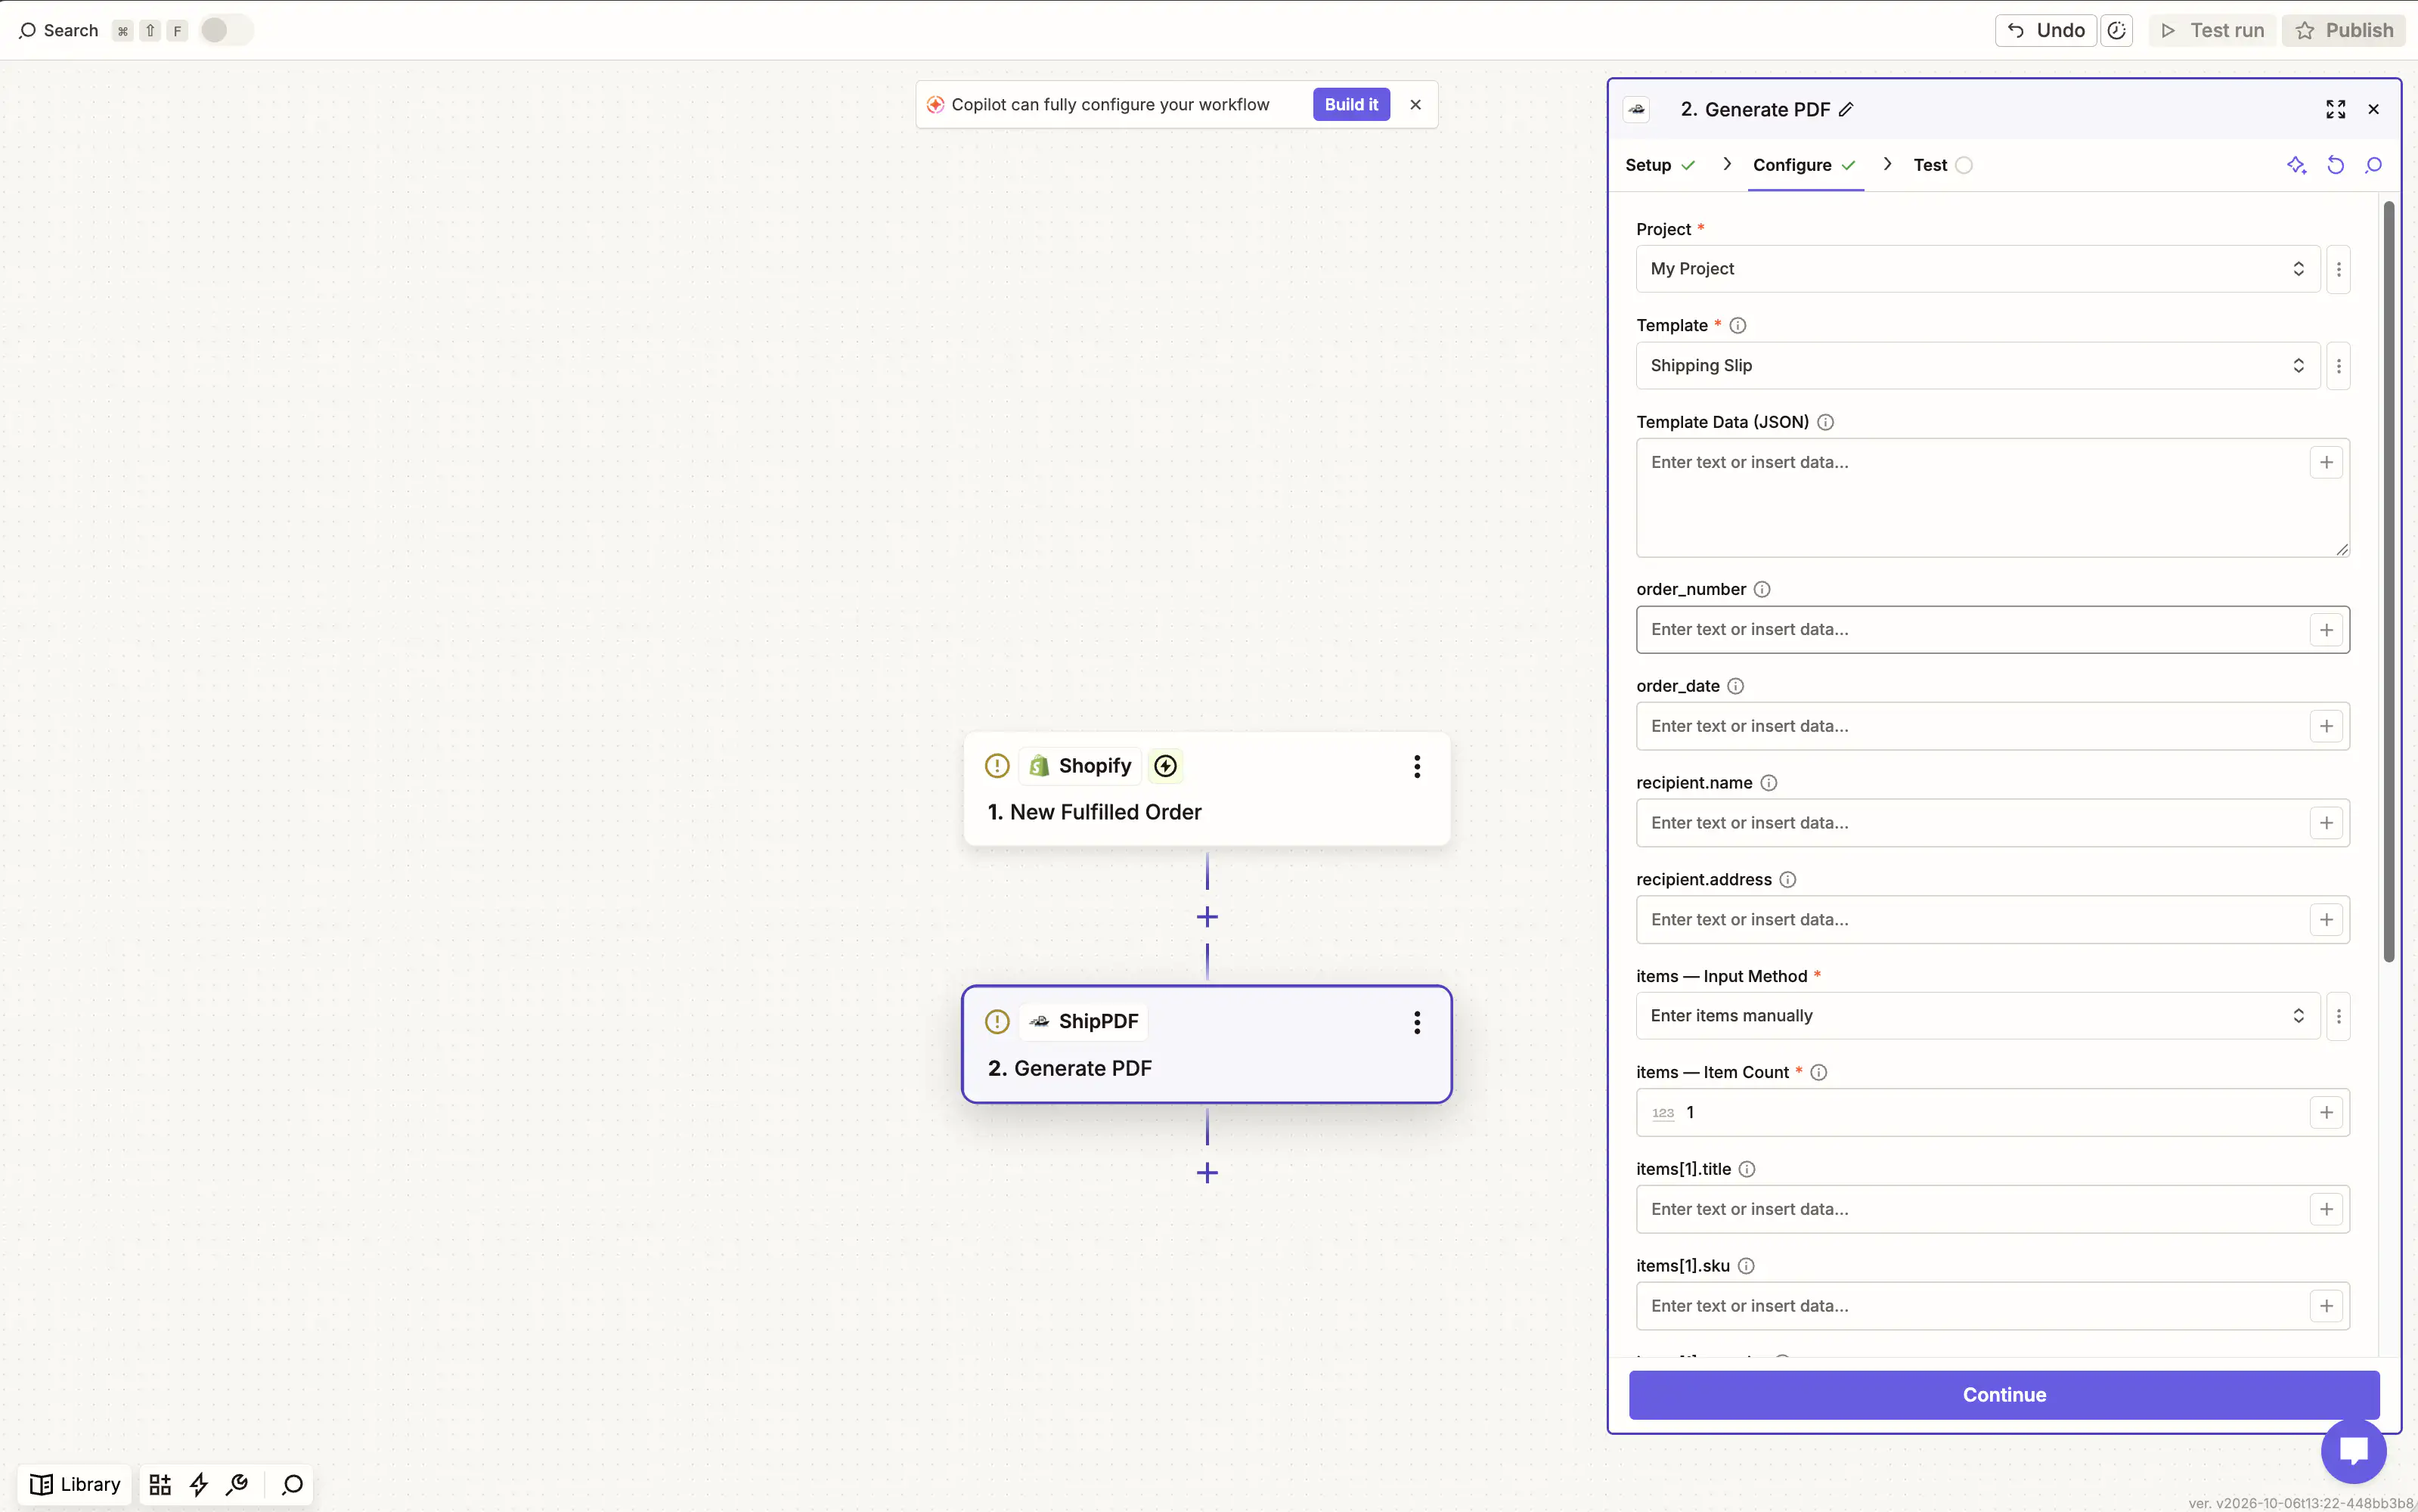
Use the shipping recipient rather than assuming the customer or billing name identifies the person receiving the parcel. Omit absent address lines cleanly. For order notes, decide which content is appropriate to print; internal picking instructions should not automatically appear on the customer’s document.
Keep every product together as one item object. A two-product order must
produce two objects in items, with each title, SKU, and quantity aligned.
Do not map all product names into one text cell or split names on commas.
The API expects an array of objects, not separate lists or a quoted JSON string. Depending on the trigger output, assembling that array may require a transform step or a small Code by Zapier step. This is the part to validate carefully with your sample; the visual template removes Liquid editing, but does not remove the need to structure the order data correctly.
5. Request the packing slip PDF
Create a ShipPDF token in the workspace’s API keys section with documents:create and
documents:read. In Zapier, use API by Zapier → API Request, with a connection
that sends an Authorization header whose value is Bearer YOUR_SHIPPDF_TOKEN.
Restrict the connection to api.shippdf.com. Zapier currently documents this
feature as beta; consult its API request instructions
for the current interface.
Configure the request using ShipPDF’s API reference:
| Setting | Value |
|---|---|
| Method | POST |
| URL | https://api.shippdf.com/v1/documents |
| Content-Type header | application/json |
| Idempotency-Key header | A stable key for this store, order, and document version |
Here is an illustrative body using the three products shown in the preview. Replace the template ID and
callback URL, and map the sample data to the values from your Shopify step.
The fields under data must match your published schema.
{
  "template_id": "tmpl_REPLACE_ME",
  "webhook_url": "https://hooks.zapier.com/hooks/catch/REPLACE_ME/REPLACE_ME/",
  "metadata": {
    "store": "example-store",
    "order_id": "123456789",
    "document_version": "packing-slip-v1"
  },
  "data": {
    "order_number": "1763",
    "order_date": "2026-10-07",
    "recipient": {
      "name": "John Smith",
      "address": "150 Elgin Street, 8th Floor, Ottawa, ON K2P 1L4"
    },
    "items": [
      {
        "title": "RAVEN BLACK/NUDE - 40 / M - BLACK",
        "sku": "AS1417-9909",
        "quantity": 2,
        "image_url": "https://images.unsplash.com/photo-1542291026-7eec264c27ff?w=400"
      },
      {
        "title": "ORBIT RUNNER - 42 / M - WHITE",
        "sku": "OR2210-4401",
        "quantity": 1,
        "image_url": "https://images.unsplash.com/photo-1549298916-b41d501d3772?w=400"
      },
      {
        "title": "CANVAS BACKPACK - NATURAL",
        "sku": "CT0098-1203",
        "quantity": 3,
        "image_url": "https://images.unsplash.com/photo-1553062407-98eeb64c6a62?w=400"
      }
    ],
    "customer_message": "Please gift wrap"
  }
}
An example idempotency key is example-store:123456789:packing-slip-v1.
Reuse it for retries of the same request. Use a new document version when you
intentionally generate a corrected slip. ShipPDF returns 409 if a request
with that key is still generating; handle that as an in-progress request.
Test the step. A successful generation request returns 202, a document id,
and status: queued. The PDF is not ready at that point, and pdf_url is null.
Record the document ID against the order so completion can be matched to the
request.
6. Receive the completed PDF in a second Zap
Create the second Zap first with Webhooks by Zapier → Catch Hook and use its
URL as webhook_url in the request above. ShipPDF sends a callback when generation
finishes. Zapier documents Catch Hook in its Webhooks integration.
ShipPDF’s callback is unsigned. Before delivering a document, match its ID to
your recorded request and fetch
https://api.shippdf.com/v1/documents/DOCUMENT_ID through the authenticated API
connection. Use that response to confirm the order metadata and
status: completed, then use its pdf_url. Route failed documents for review.
Save the actual PDF file to your chosen storage destination with an action
that accepts a file URL. Use a recognizable filename, such as
packing-slip-1763.pdf, and notify the packing team with the stored file link.
The ShipPDF URL is short-lived, so saving the URL as plain text is not a durable
archive.
Deduplicate callback processing by document ID before sending repeated notifications. The generation idempotency key protects the generation request; it does not deduplicate later delivery actions.
Alternatively, you can fetch the document until it completes. A single fixed delay is not proof that generation has finished; a polling workflow needs status checks, bounded retries, and a failure path. The Quickstart explains both polling and callbacks.
7. Test the whole packing workflow
Before turning the automation on, check:
- Two or more products retain their correct SKUs and quantities.
- Long names and addresses fit, and multi-page tables remain readable.
- Missing optional fields do not print sample data or the word
null. - Ineligible orders stop before generating a document.
- Retrying a request and receiving a repeated callback do not create duplicate work.
- A failed generation reaches someone who can resolve it.
- The saved PDF opens and prints correctly at the intended paper size.
Recheck order details before packing if orders can be edited after the trigger. A document generated at payment time is a snapshot, not a live view of the order.
How to handle partial shipments and multiple locations
Suppose a customer orders five mugs, but only two go in today’s parcel. The packing slip for that parcel should say two. Sending the original order quantity to the template would tell the recipient that all five arrived.
For this reason, a paid-order trigger should not be your source of shipment
quantities for split orders. Shopify’s native template distinguishes shipment
items from order totals through line_items_in_shipment and
line_item.shipping_quantity, as shown in its
variable reference.
For an external PDF workflow, obtain the actual shipment’s items and quantities from your fulfillment process. That may require an additional Shopify API lookup, a warehouse integration, or a separate event when the shipment is prepared. Verify the payload rather than relying on the trigger’s name. An event that fires after fulfillment may also be too late for a team that needs the slip while packing.
Generate a document per shipment and include the shipment reference in both
the filename and idempotency key. For example,
example-store:123456789:shipment-2:packing-slip-v1.
Until that mapping is verified, use the native shipment-aware packing slip for
split orders.
Troubleshooting your packing slip automation
| Problem | What to check |
|---|---|
| Only one product appears | items must be an array of row objects, and the table must use that Collection. |
| A SKU appears beside the wrong product | Preserve the relationship between each product and its fields during transformation. |
| The address is blank or incorrect | Map the shipping address and check required values before generation. |
| A package shows too many items | Use package quantities; check whether the order was split or changed. |
The request returns 401 or 403 |
Check the bearer token and the scope for the endpoint being called. |
The request returns 422 |
Check publication status, schema field names, and JSON value types. |
| No PDF link appears immediately | queued is expected; wait for completion and inspect terminal status. |
| An archived link stops working | Store the PDF file or obtain a fresh URL through an authenticated document read. |
| The packing team receives duplicate messages | Deduplicate delivery separately from the generation request. |
Shopify packing slip FAQ
Can I customize a Shopify packing slip without Liquid?
You can design a separate packing slip visually in ShipPDF and generate it from Shopify data through Zapier. Shopify’s native template editor still uses Liquid; this workflow produces its own PDF.
Can I add my logo to a Shopify packing slip?
Yes. For the native template, follow Shopify’s code-editing instructions. In a ShipPDF template, add your logo as an image in the visual layout and preview it at print size.
Can Zapier automatically print packing slips?
This workflow automatically generates and routes PDF files. Unattended physical printing requires a separate print service or printer integration. Saving a PDF or sending an email does not by itself start a printer.
Is a packing slip the same as an invoice?
They serve different purposes. A packing slip identifies package contents; an invoice describes the charges. You can maintain separate templates for each.
Is the Shopify–Zapier workflow free?
Budget for your Shopify subscription, Zapier plan and task usage, and ShipPDF generation credits. File storage or printing services may add costs. Estimate from the steps that run per order and the number of shipments, rather than assuming one order equals one Zapier task. See ShipPDF pricing.
Should I choose Order Printer Pro or Zapier?
Evaluate a Shopify app when working inside Shopify is your priority. Choose ShipPDF with Zapier when you want visual control over a reusable PDF template and an automation that connects document generation to other apps. Compare the whole process, including setup and ongoing maintenance.
Build a packing slip your team can maintain
Start with one template and one representative order. Confirm the recipient, products, and quantities, then connect generation and delivery. Once that works, expand to the shipment types your team actually handles.
Create your ShipPDF account to design the packing slip, or explore the visual editor and the packing slip use case before building your Zap.
← Back to blog