Home › Blog › Customize Zite Invoice Template with ShipPDF
Customize Zite Invoice Template with ShipPDF
Learn how to customize a Zite invoice PDF template with ShipPDF, format dates and currency, calculate totals, and save generated PDFs to your Zite database.
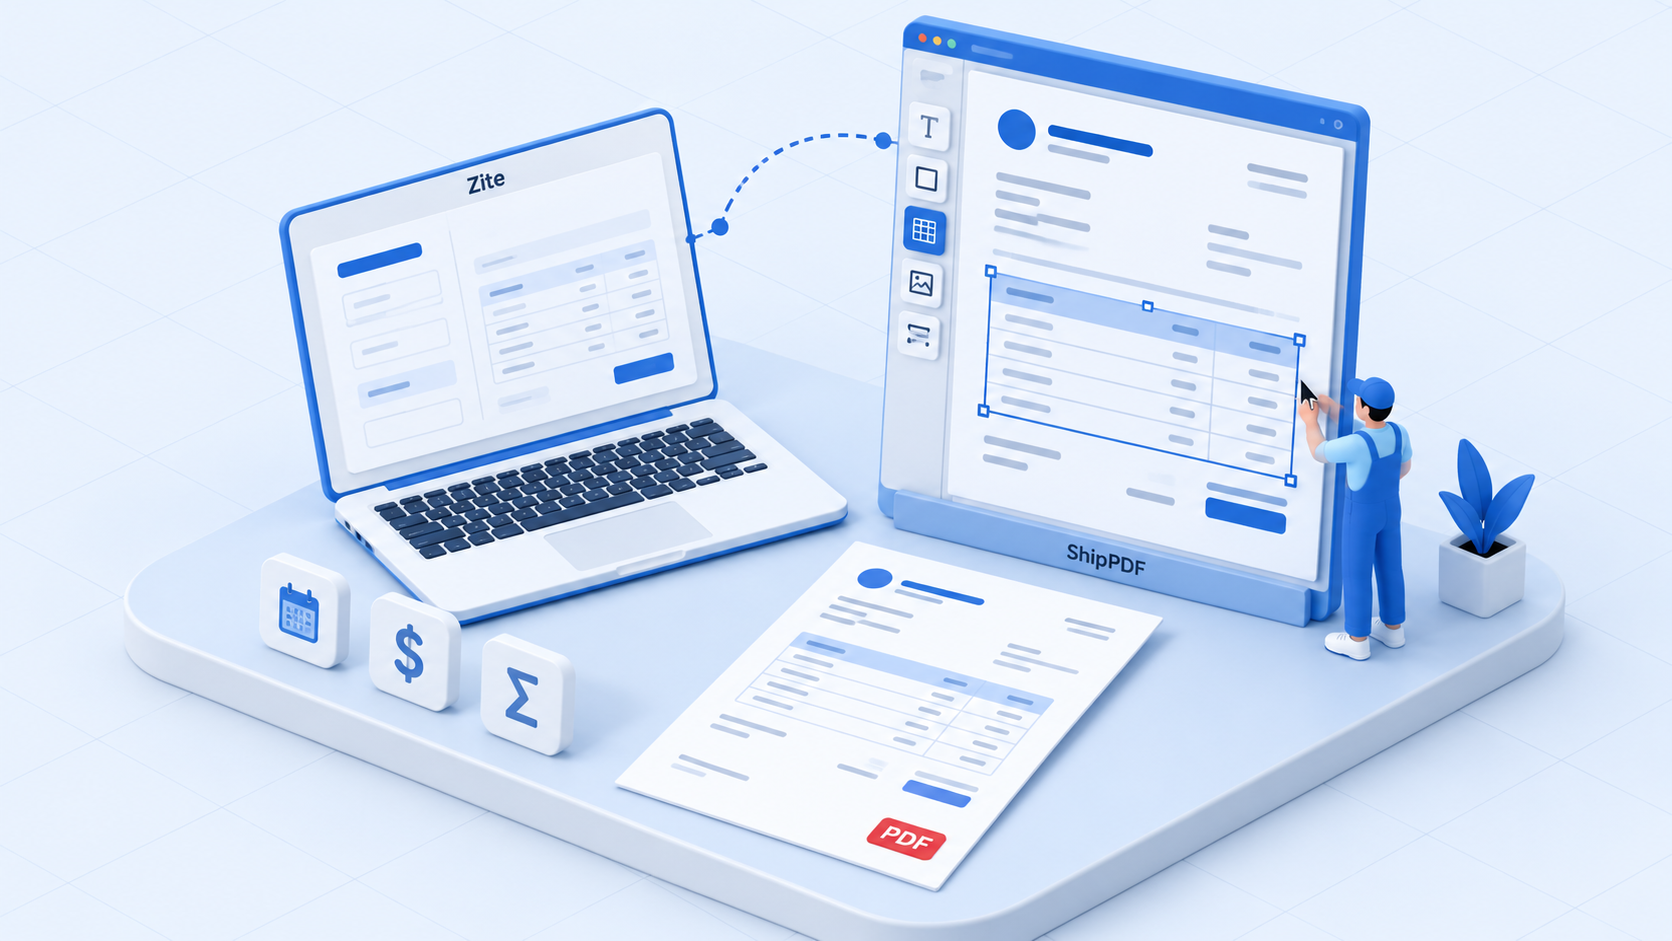
You can customize a Zite invoice PDF template by asking Zite’s AI to change the design. When you want to adjust the layout manually as well, you can build the invoice template in ShipPDF and have Zite send the invoice data to it. ShipPDF generates the PDF, then Zite saves the document on the invoice record.
Zite already supports PDF generation, listed among its workflow features. You can use it to generate an invoice and customize the template. The reason to add ShipPDF is control over the document: use AI to build or change the template, make precise adjustments in the visual editor, and keep formatting and calculations inside the template.
In this tutorial, we’ll create an invoice app in Zite, connect it to ShipPDF, and build a custom invoice PDF template. Then we’ll publish the Zite app and submit an invoice to check that the generated document reaches its PDF field.
In this guide
- Why use ShipPDF to customize a Zite invoice template?
- Build the invoice app in Zite
- Ask Zite to connect to ShipPDF
- Save the PDF file
- Build the template in ShipPDF
- Publish and test the workflow
- Troubleshooting
Why use ShipPDF to customize a Zite invoice template?
Zite’s template editing is a useful starting point. You can describe a change to its AI, but small manual adjustments are less convenient. Sometimes it’s easier to select an element and change its spacing, alignment, or size yourself than to write another prompt.
ShipPDF gives you both ways to work. Ask an AI assistant to create or revise the invoice template, then open it in the visual editor to refine the layout. For example, you might ask AI to add your branding, then manually widen the description column or adjust the space above the total.
It also handles two recurring invoice tasks inside the template:
- Date and currency formatting. Send a date or number as data, then choose its locale and display format in ShipPDF. You can use a custom date pattern and set the currency code and decimal places for amounts.
- Formulas. Calculate line amounts, subtotal, tax, and the final total from the invoice’s input values. You don’t need separate Zite database columns for every calculated value just to display them in the PDF.
Zite remains the place where you enter and manage invoices. ShipPDF controls how those invoices appear as documents.
How the Zite and ShipPDF integration works
 Zite
ZiteThat last step matters. ShipPDF returns a signed download URL that expires. The URL lets Zite retrieve the file, but storing that URL alone won’t give you a lasting invoice attachment.
1. Build the invoice table and form in Zite
Start by asking Zite to create an invoice app. You can use this prompt:
Create an invoice app with an invoice list and a form for creating
and editing invoices.

Each invoice needs an invoice ID, issuance date, recipient,
recipient address, and tax rate entered as a percentage.

Each invoice has line items with description, unit price, and quantity.
Let me add and remove line items. Show the subtotal, tax amount,
and total after tax while I fill out the form.

Save invoices and their related line items in the database.
For this example, Zite created Invoices and Line Items tables, plus a form with the invoice details and an editable line-item list.
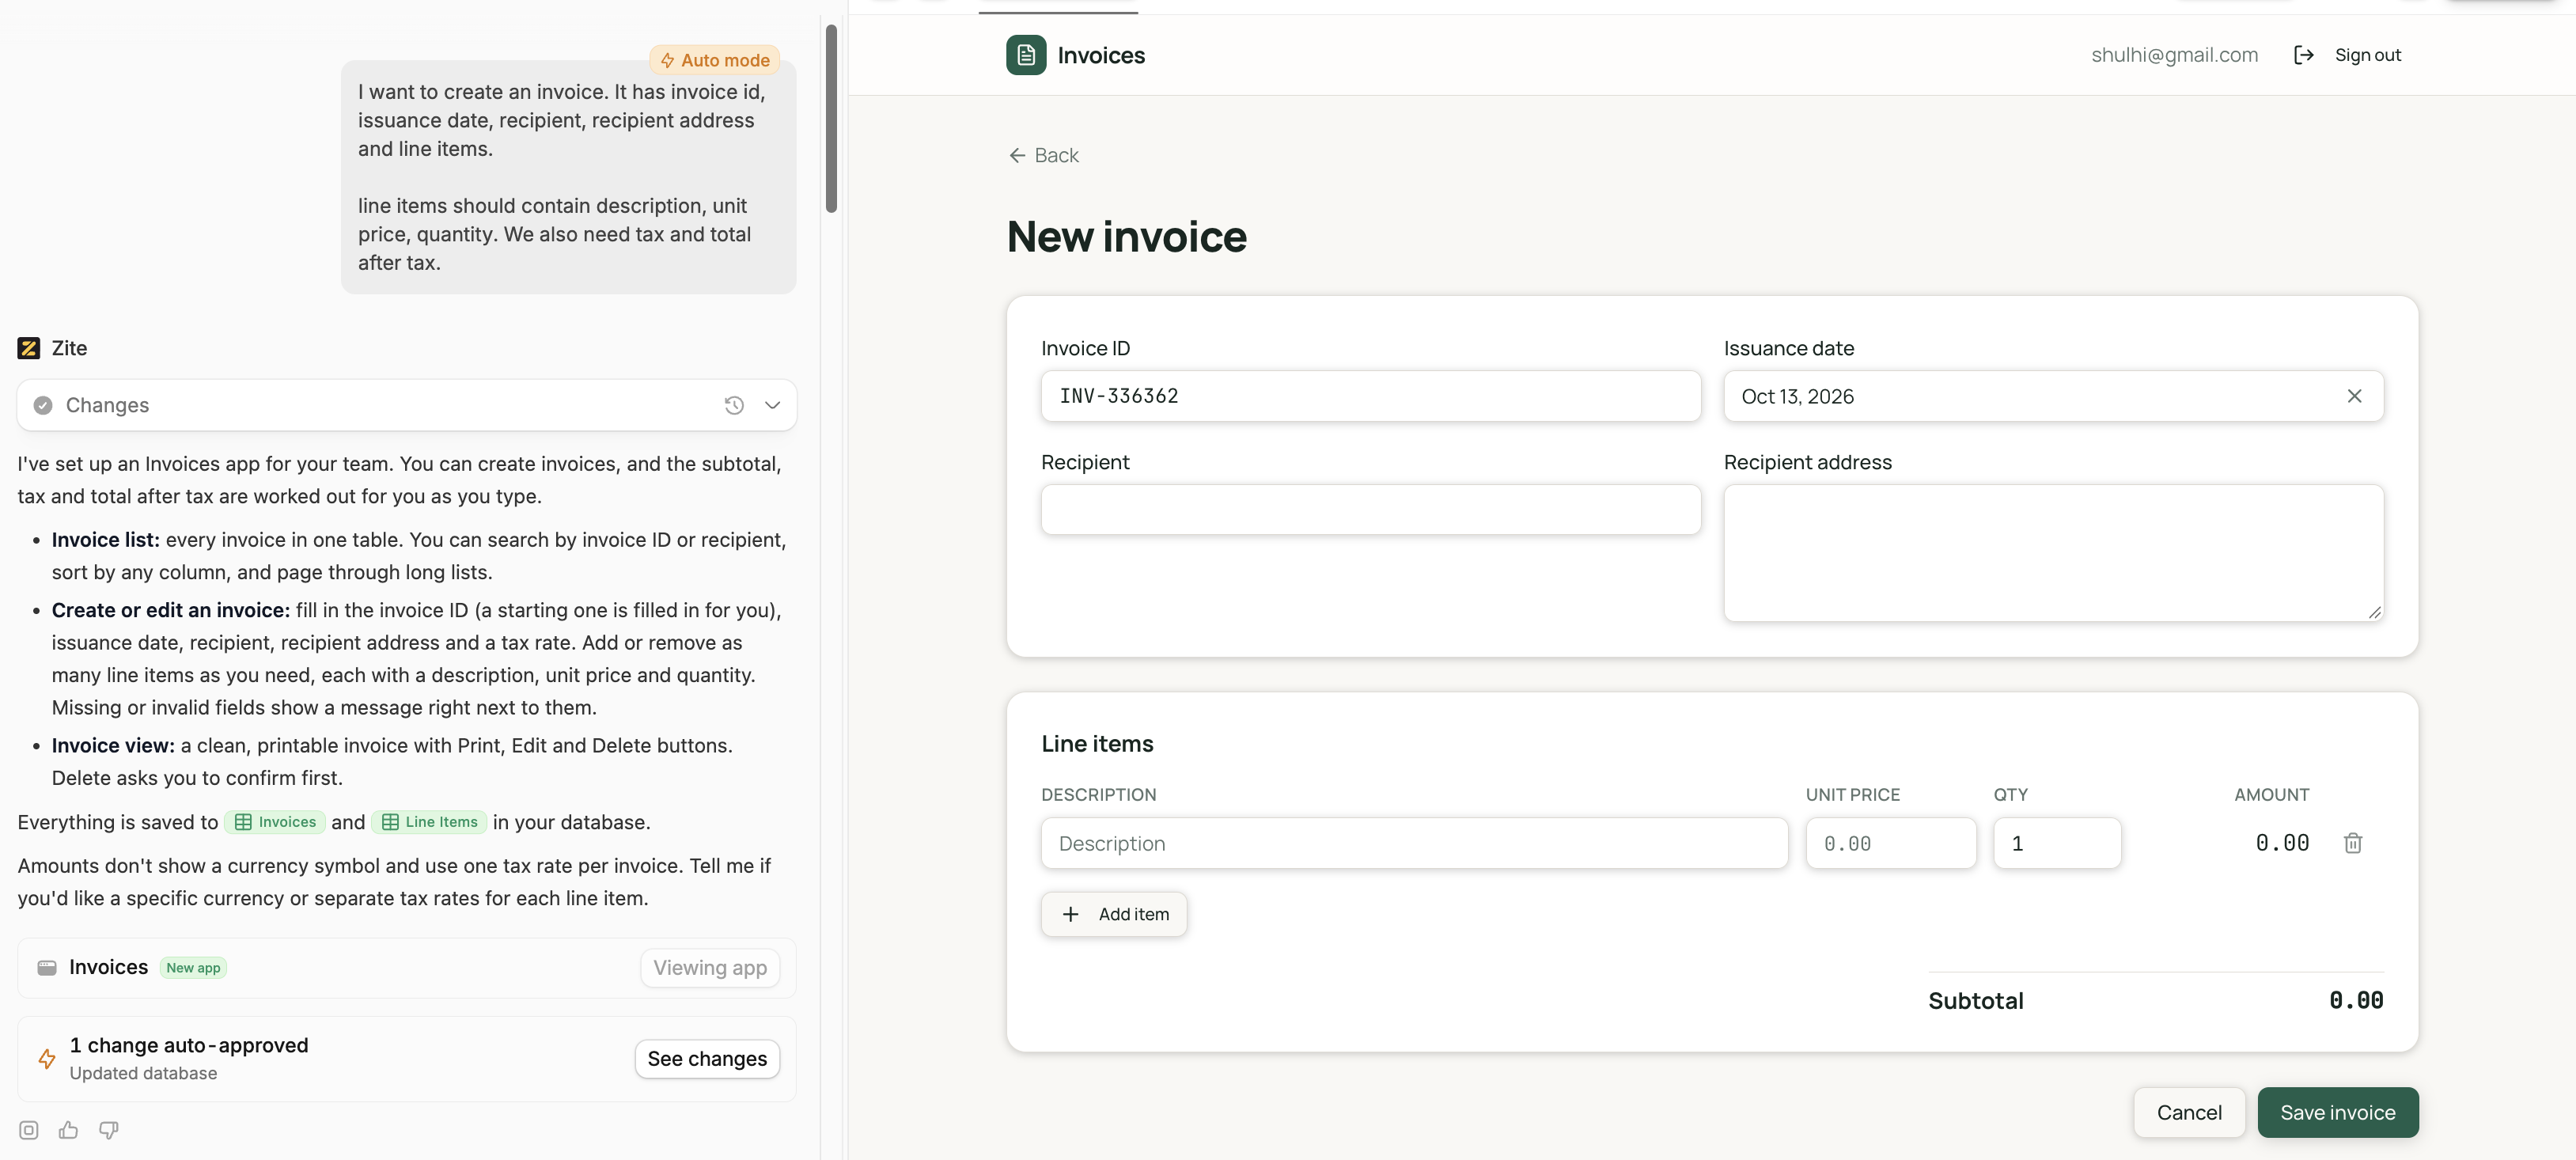
The form can still show calculated totals while someone enters an invoice. ShipPDF’s formulas will calculate the values displayed in the document from the same inputs. Use the same tax and rounding rules in both places.
2. Ask Zite to call the ShipPDF API
Next, ask Zite to generate a PDF whenever a new invoice is saved. Include a link to the ShipPDF API reference in your prompt. This gives Zite the request and response schemas, authentication details, and webhook behavior to follow.
Paste this into Zite:
Connect this invoice app to ShipPDF for PDF generation.

Use the ShipPDF API reference:
https://shippdf.com/docs/api/

When a new invoice is saved, call POST https://api.shippdf.com/v1/documents
from a backend workflow using my published template ID and the submitted
invoice data. Keep the API token in a secret and use Bearer authentication.

Send the invoice ID, issuance date, recipient, recipient address,
and line items. Each item should contain description, unit_price,
quantity, and tax_rate. Copy the invoice's percentage tax rate into
each item's tax_rate so the template can calculate tax per row.
I'll provide the template ID and final data schema after setting up ShipPDF.

Create an HTTPS webhook endpoint and give me its URL so I can register
it in ShipPDF's Webhooks settings for this invoice template.
Use that saved webhook for completion notifications.
Include the Zite invoice record ID in metadata so the notification
can be matched to the correct invoice.

Store the returned ShipPDF document ID on the invoice. Show Generating,
Ready, or Failed status, plus an error message when generation fails.
Add a Generate / Regenerate / Retry PDF action.

Before accepting a callback, authenticate it using the documented
webhook verification or verify the saved document ID and its result
through ShipPDF's authenticated GET document endpoint.
Generation is asynchronous. The initial API response returns a document ID while the PDF is queued. The webhook delivers the result when generation completes or fails, so Zite shouldn’t expect a PDF in the initial response.
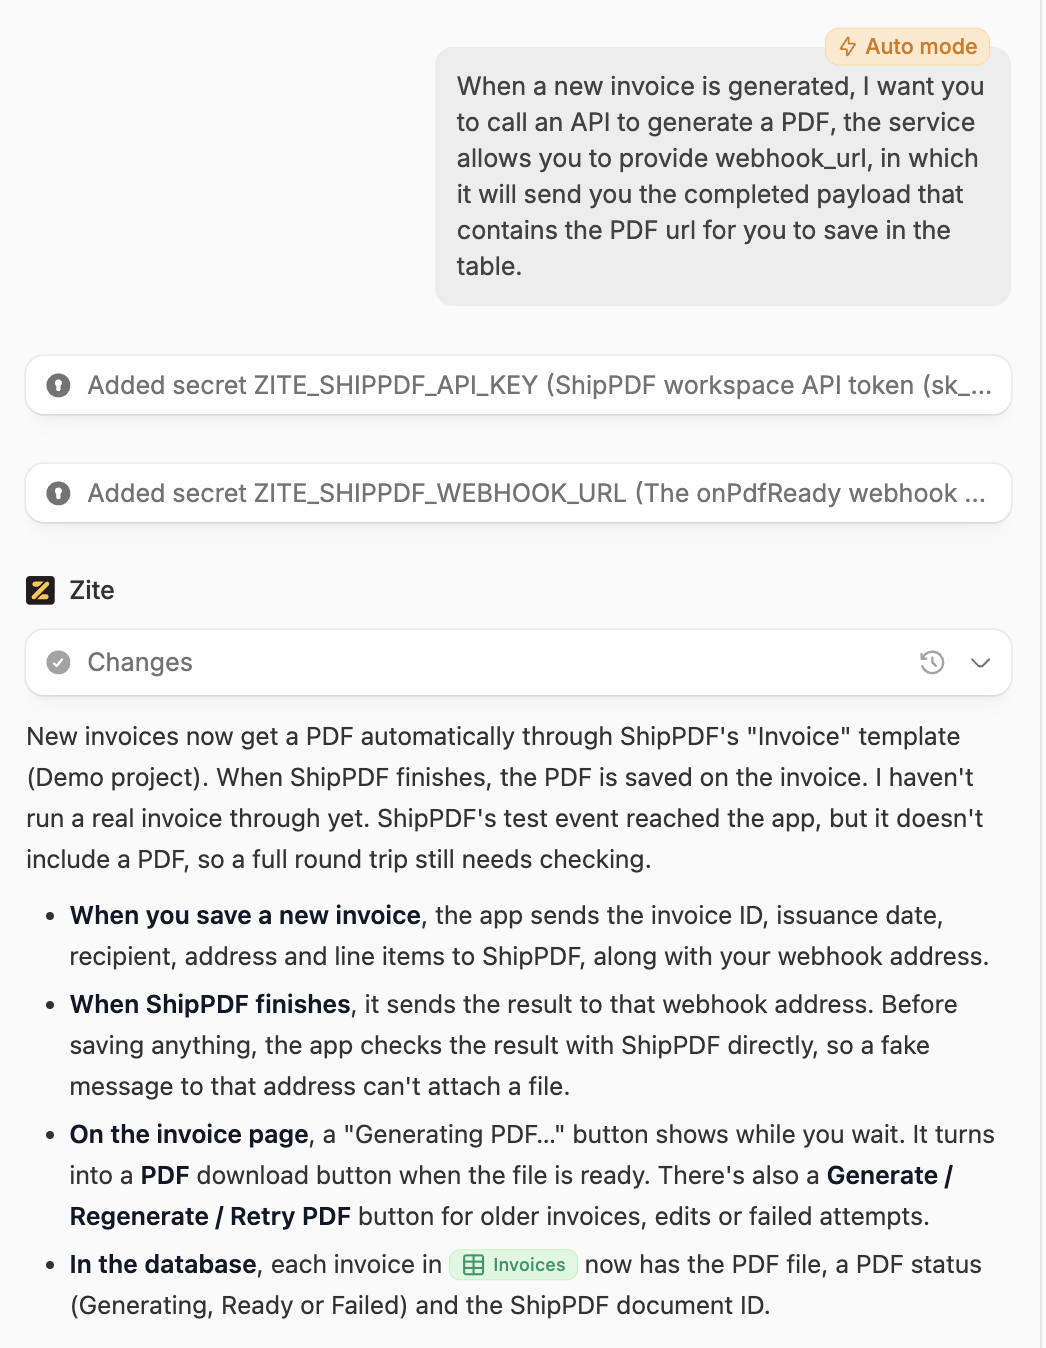
A successful webhook test checks that the endpoint can receive an event. You’ll still need to submit a real invoice to check generation and file storage together.
3. Ask Zite to download and save the PDF file
Make the storage requirement explicit with a follow-up prompt:
Use the ShipPDF API reference:
https://shippdf.com/docs/api/

ShipPDF's pdf_url is a signed URL with an expiration.
Download the PDF from that URL and upload the actual file into the
invoice's PDF file field. Don't store only the ShipPDF download URL.

Save the file automatically after a verified completion callback,
without requiring someone to open the invoice page, if the backend
workflow supports downloading and uploading files.

Keep the ShipPDF document ID. If the URL has expired, fetch the same
document with GET /v1/documents/{document_ref} to obtain a fresh URL.
Do not generate another PDF just to refresh the download URL.

Show file-saving errors and allow retrying the download and upload.
Only show the invoice as Ready when its PDF file has been saved.
In the version shown below, Zite changed the app to download and upload the file when someone opens the invoice. If the generation is complete but the PDF field is empty, opening the invoice starts the save step.
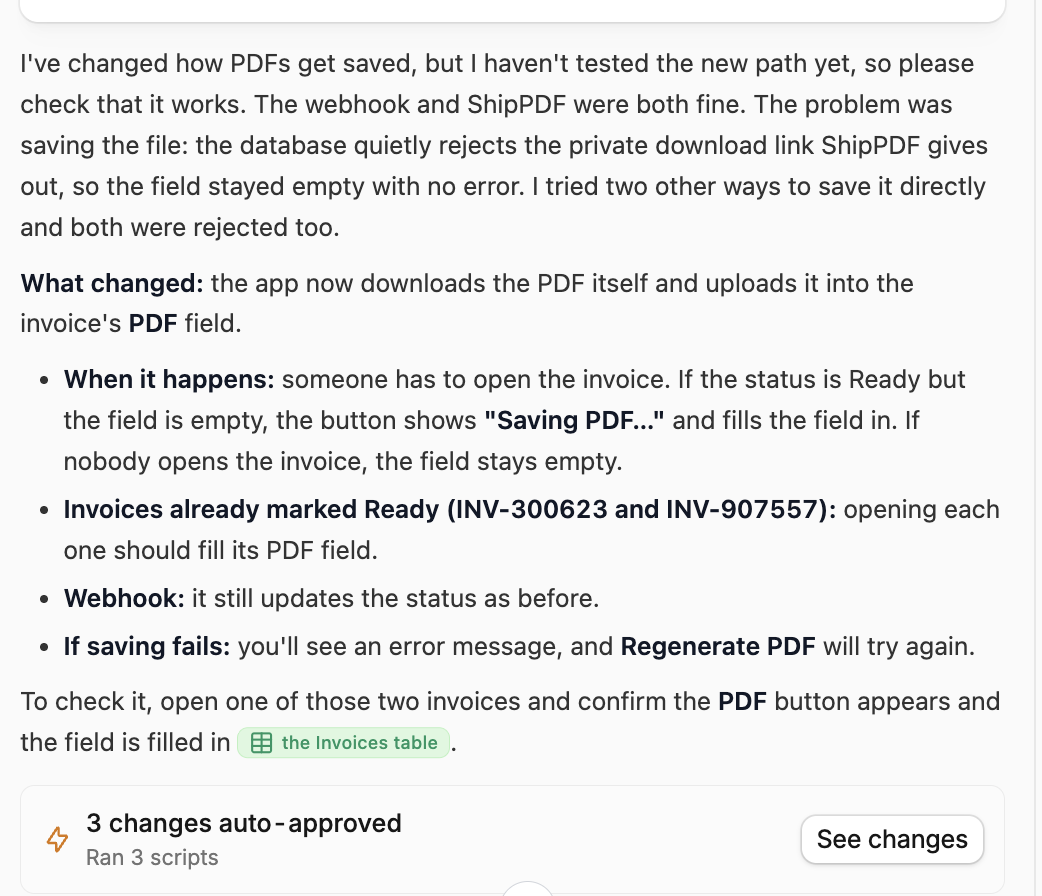
If your version behaves this way, include opening the invoice in your test. For unattended storage, ask Zite to move the download and upload into the backend completion workflow, then test that the PDF field fills even when nobody visits the invoice page.
4. Build your custom invoice template in ShipPDF
Now set up the document that ShipPDF will generate. Create your ShipPDF account, create a project, and create an invoice template.
You can build it in the editor or connect ShipPDF to your AI assistant through MCP and ask it to create the layout. MCP gives the assistant tools to create and edit templates directly in your ShipPDF workspace.
Start with a sample invoice image
If you already have a design you like, drop a sample invoice image into the conversation. Ask the assistant to use it as the visual reference and build the template in ShipPDF. It can create the layout and data fields, create supporting visual assets such as decorative shapes, upload those assets to ShipPDF, and assemble the template through MCP.
You don’t need to describe every spacing and design detail. The image gives the assistant a starting point, and you can make manual adjustments afterward. For our example, we asked it to redesign the invoice around a reference with a large title, side-by-side sender and recipient details, a gray table header, and wave shapes at the bottom.
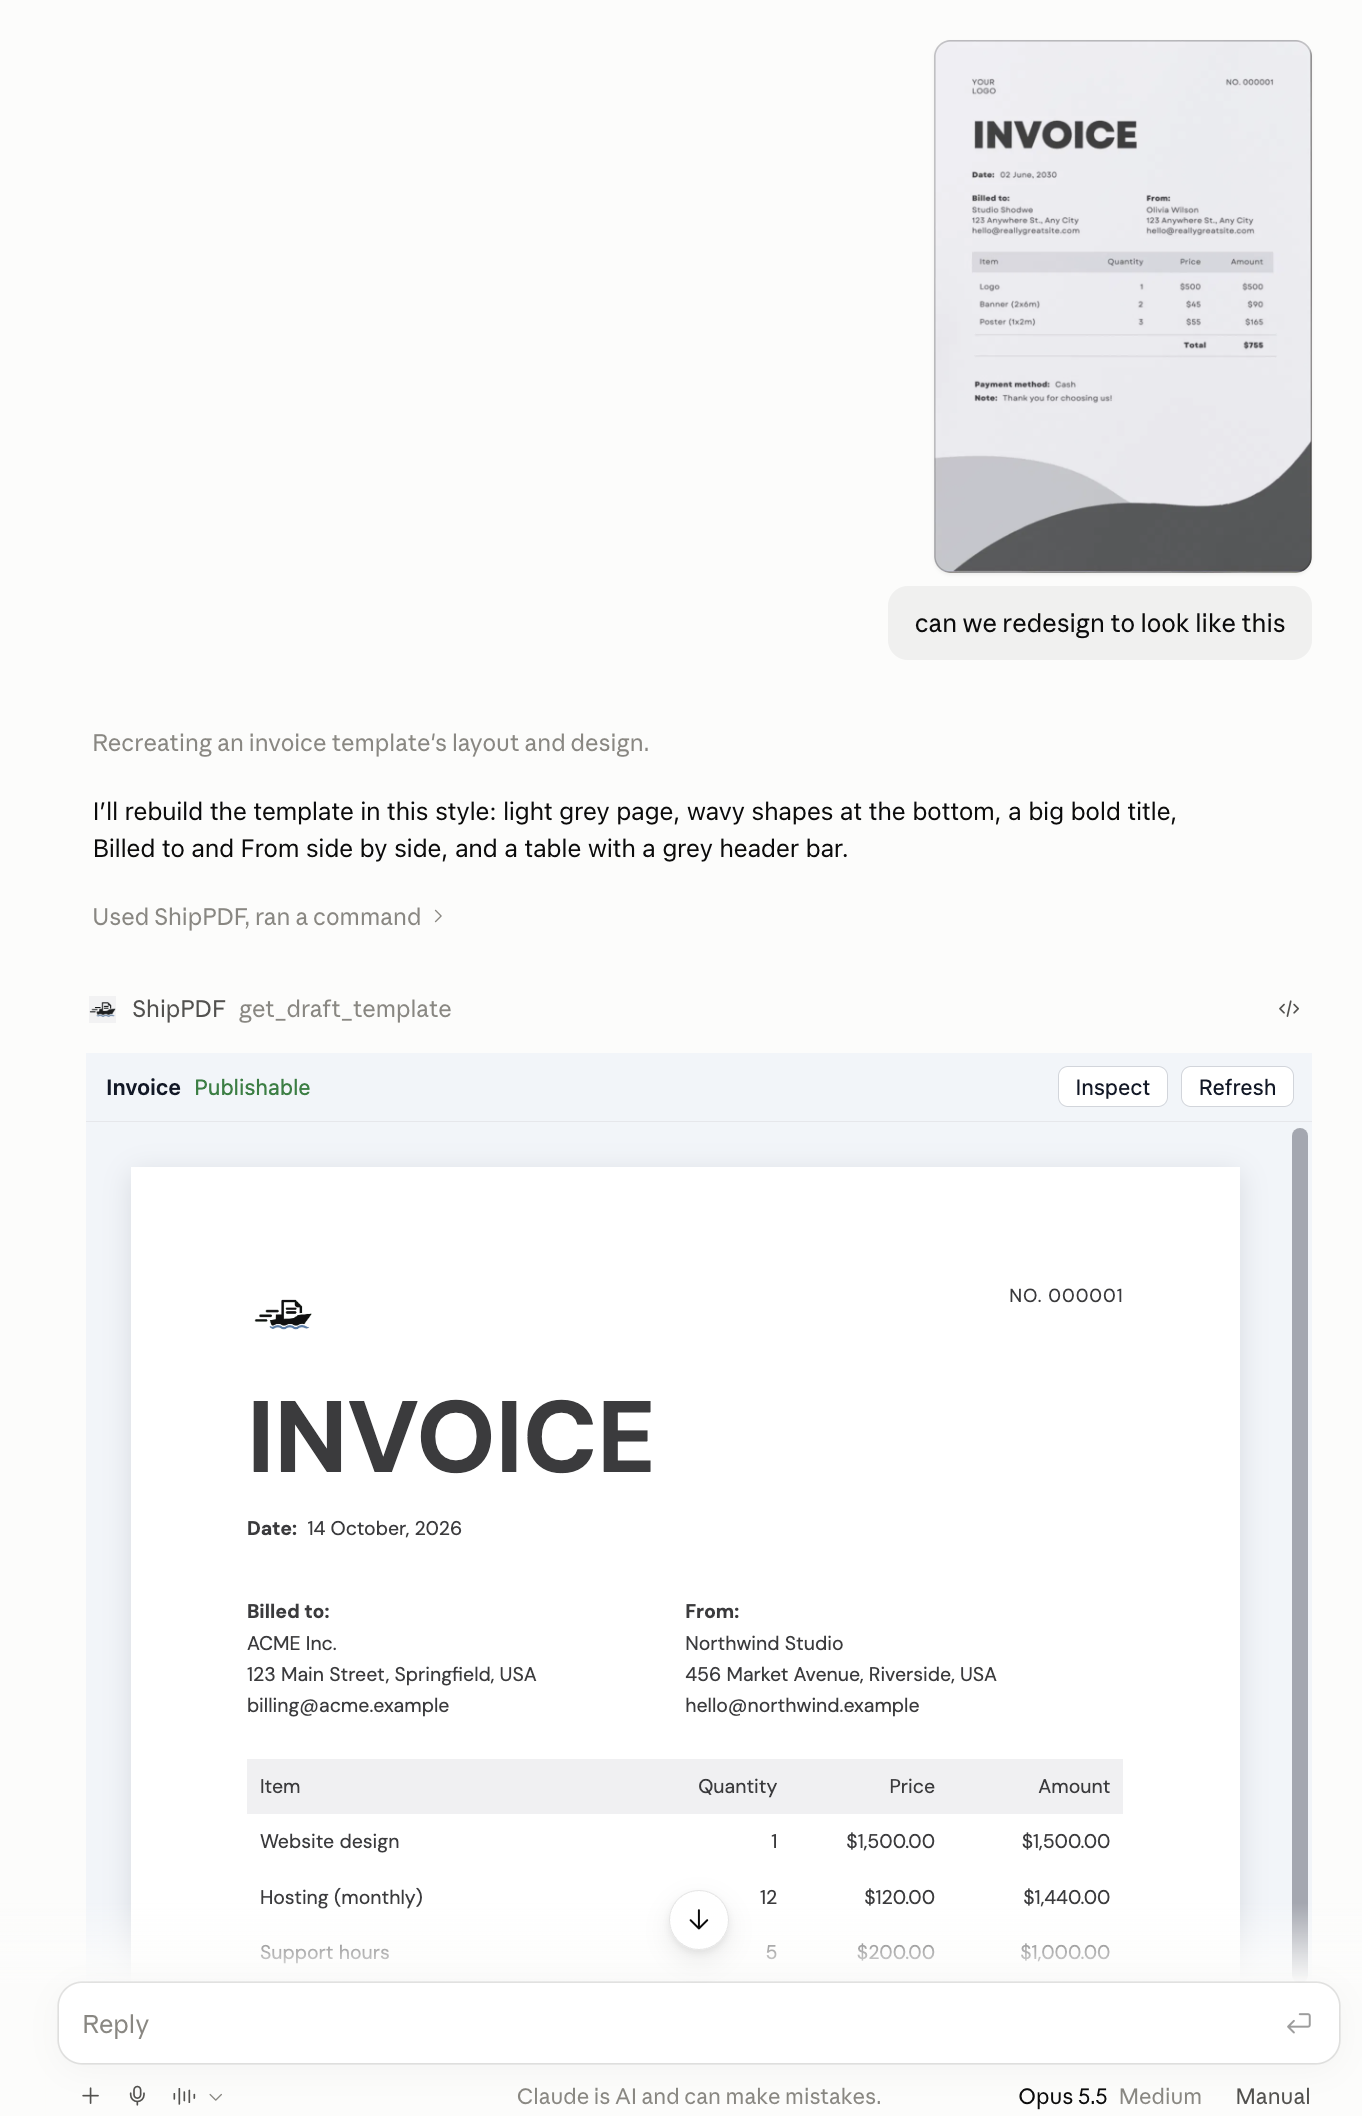
With ShipPDF connected and your reference image attached, use a prompt like this:
Use the attached invoice image as the design reference and create
the complete editable template in ShipPDF through MCP.
Create any supporting visual assets and upload them to ShipPDF.

Include a company header, invoice ID, issuance date, recipient name
and address, and a line-item table. Make the invoice values dynamic
and keep the layout editable so I can adjust it manually afterward.

Use invoice.items as the table collection. Include description,
quantity, unit price, and a calculated amount column.
Add table summary formulas for subtotal, tax, and total after tax.

Use currency formatting for monetary values and a readable date format.
Keep the description column wide and align numeric columns to the right.
Show me the draft and its data schema before publishing.
Open the result in ShipPDF’s editor to refine anything that’s easier to change by hand, such as column widths, alignment, or space between sections. The AI-created template uses the same editor and API as a template you build manually.
Define the invoice data
Set up the template’s Data Schema to match the data Zite sends. Use String fields for the invoice ID, recipient, recipient address, and item description, a Date field for the issuance date, and Number fields for quantity, unit price, and tax rate. Define invoice as an Object and invoice.items as a Collection.
Add this example to Default Data so you can preview the template:
{
  "invoice": {
    "id": "INV-1042",
    "issuance_date": "2026-10-13",
    "recipient": "Northstar Studio",
    "recipient_address": "12 Market Street\nKuching, Sarawak",
    "items": [
      {
        "description": "Website design",
        "unit_price": 500,
        "quantity": 2,
        "tax_rate": 6
      },
      {
        "description": "Monthly maintenance",
        "unit_price": 150,
        "quantity": 1,
        "tax_rate": 6
      }
    ]
  }
}
Here, tax_rate: 6 means 6%. Zite copies the invoice’s rate into each item for the formulas below. Send dates and numbers as raw values, then let the template format them. For more detail, see Data Schema and Default Data.
Bind the fields and format dates and currency
Bind the invoice ID, issuance date, recipient, and address to Text elements. Set the line-item table’s source to invoice.items, then bind its columns to the item fields.
Select the issuance-date field pill, choose Date as its format, and set the locale. For a custom format, select Custom pattern under Date pattern and enter your pattern. In the screenshot, en-US with dd MMMM, yyyy shows the preview date as 20 September, 2026. The same pattern displays our sample date, 2026-10-13, as 13 October, 2026.
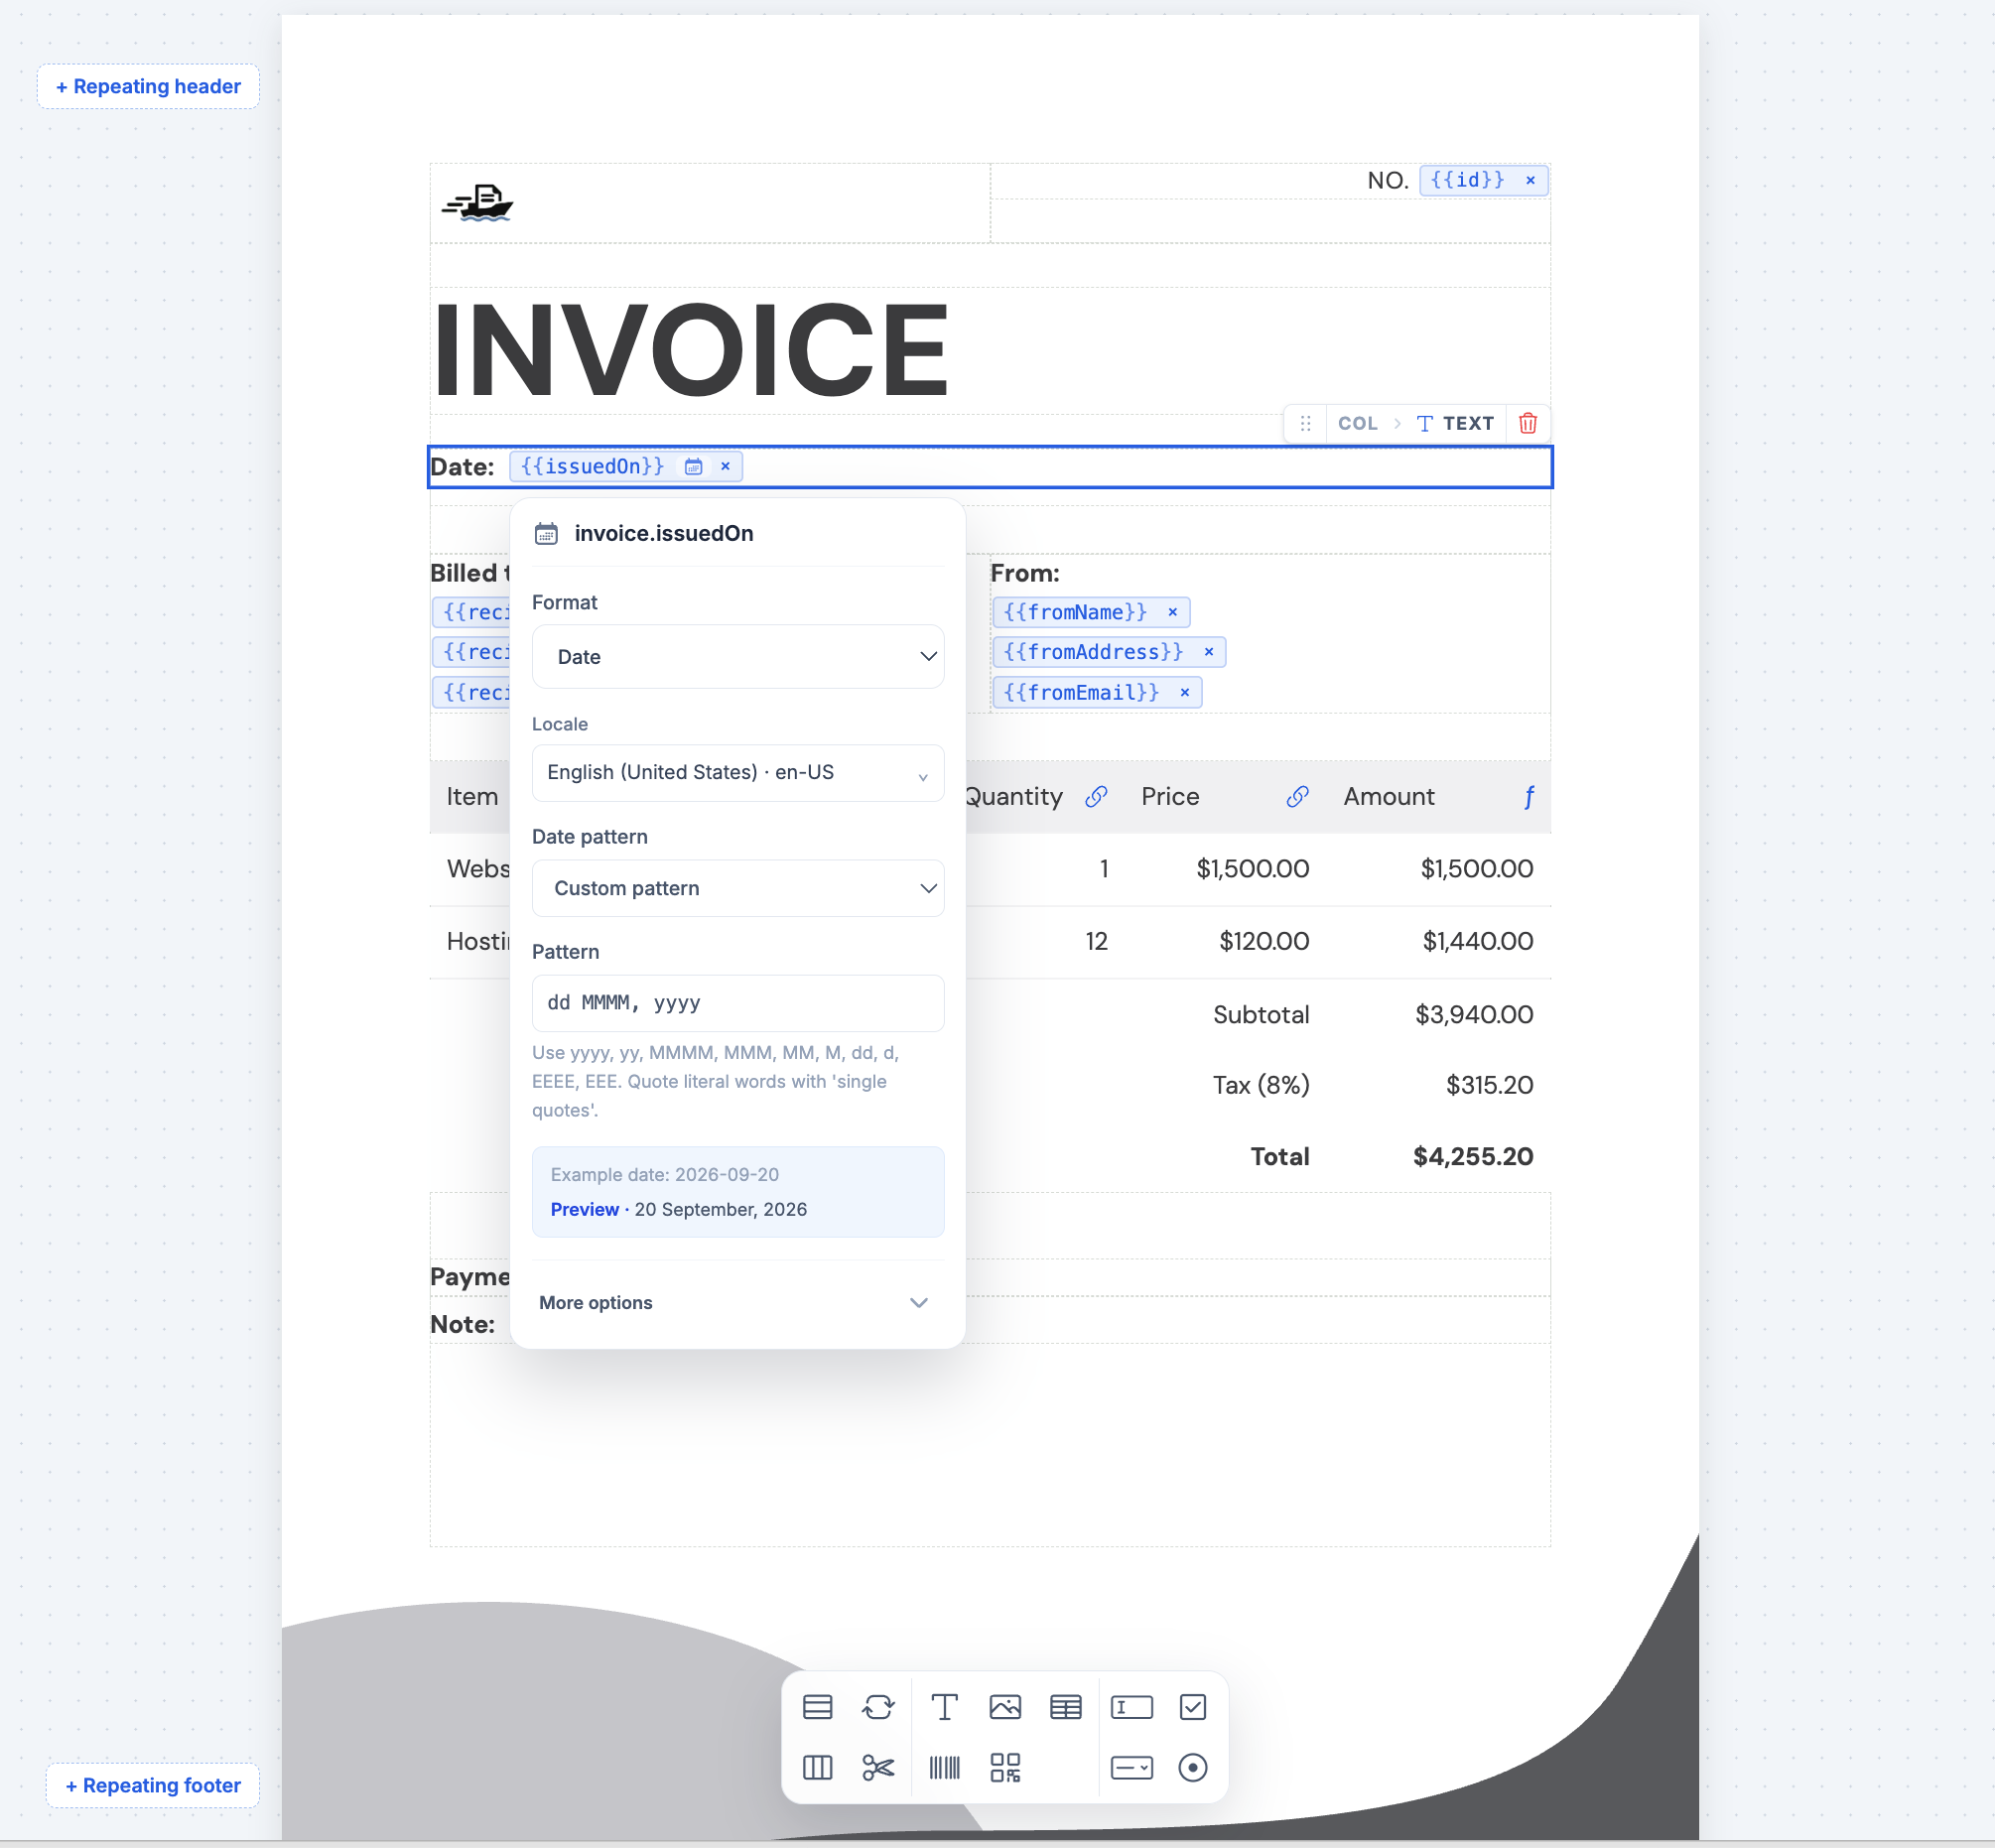
For unit prices and calculated amounts, choose currency formatting with a locale, currency code, and decimal places. For example, en-US, USD, and two decimal places displays 1150 as $1,150.00. Use the currency your invoices need. Currency formatting controls presentation and does not convert the amount into another currency.
These settings belong to each binding, so quantities can stay plain numbers while prices appear as currency. See Data field bindings and formatting.
Calculate amounts with formulas
Set the table’s Amount column to a formula:
{{invoice.items.quantity}} * {{invoice.items.unit_price}}Then add table summary formulas for Subtotal, Tax, and Total:
Subtotal
SUM({{invoice.items.quantity}} * {{invoice.items.unit_price}})

Tax
SUM({{invoice.items.quantity}} * {{invoice.items.unit_price}} * {{invoice.items.tax_rate}} / 100)

Total
SUM({{invoice.items.quantity}} * {{invoice.items.unit_price}} * (1 + {{invoice.items.tax_rate}} / 100))
Use these formulas in the table’s formula controls. Aggregate functions such as SUM() belong in table summaries. Apply currency formatting to their results as well.
With our sample data, the subtotal is $1,150.00, tax is $69.00, and the total is $1,219.00. No amount, subtotal, or total values are needed in the request. ShipPDF derives them from the inputs. This example uses one percentage tax rate without discounts or shipping charges.
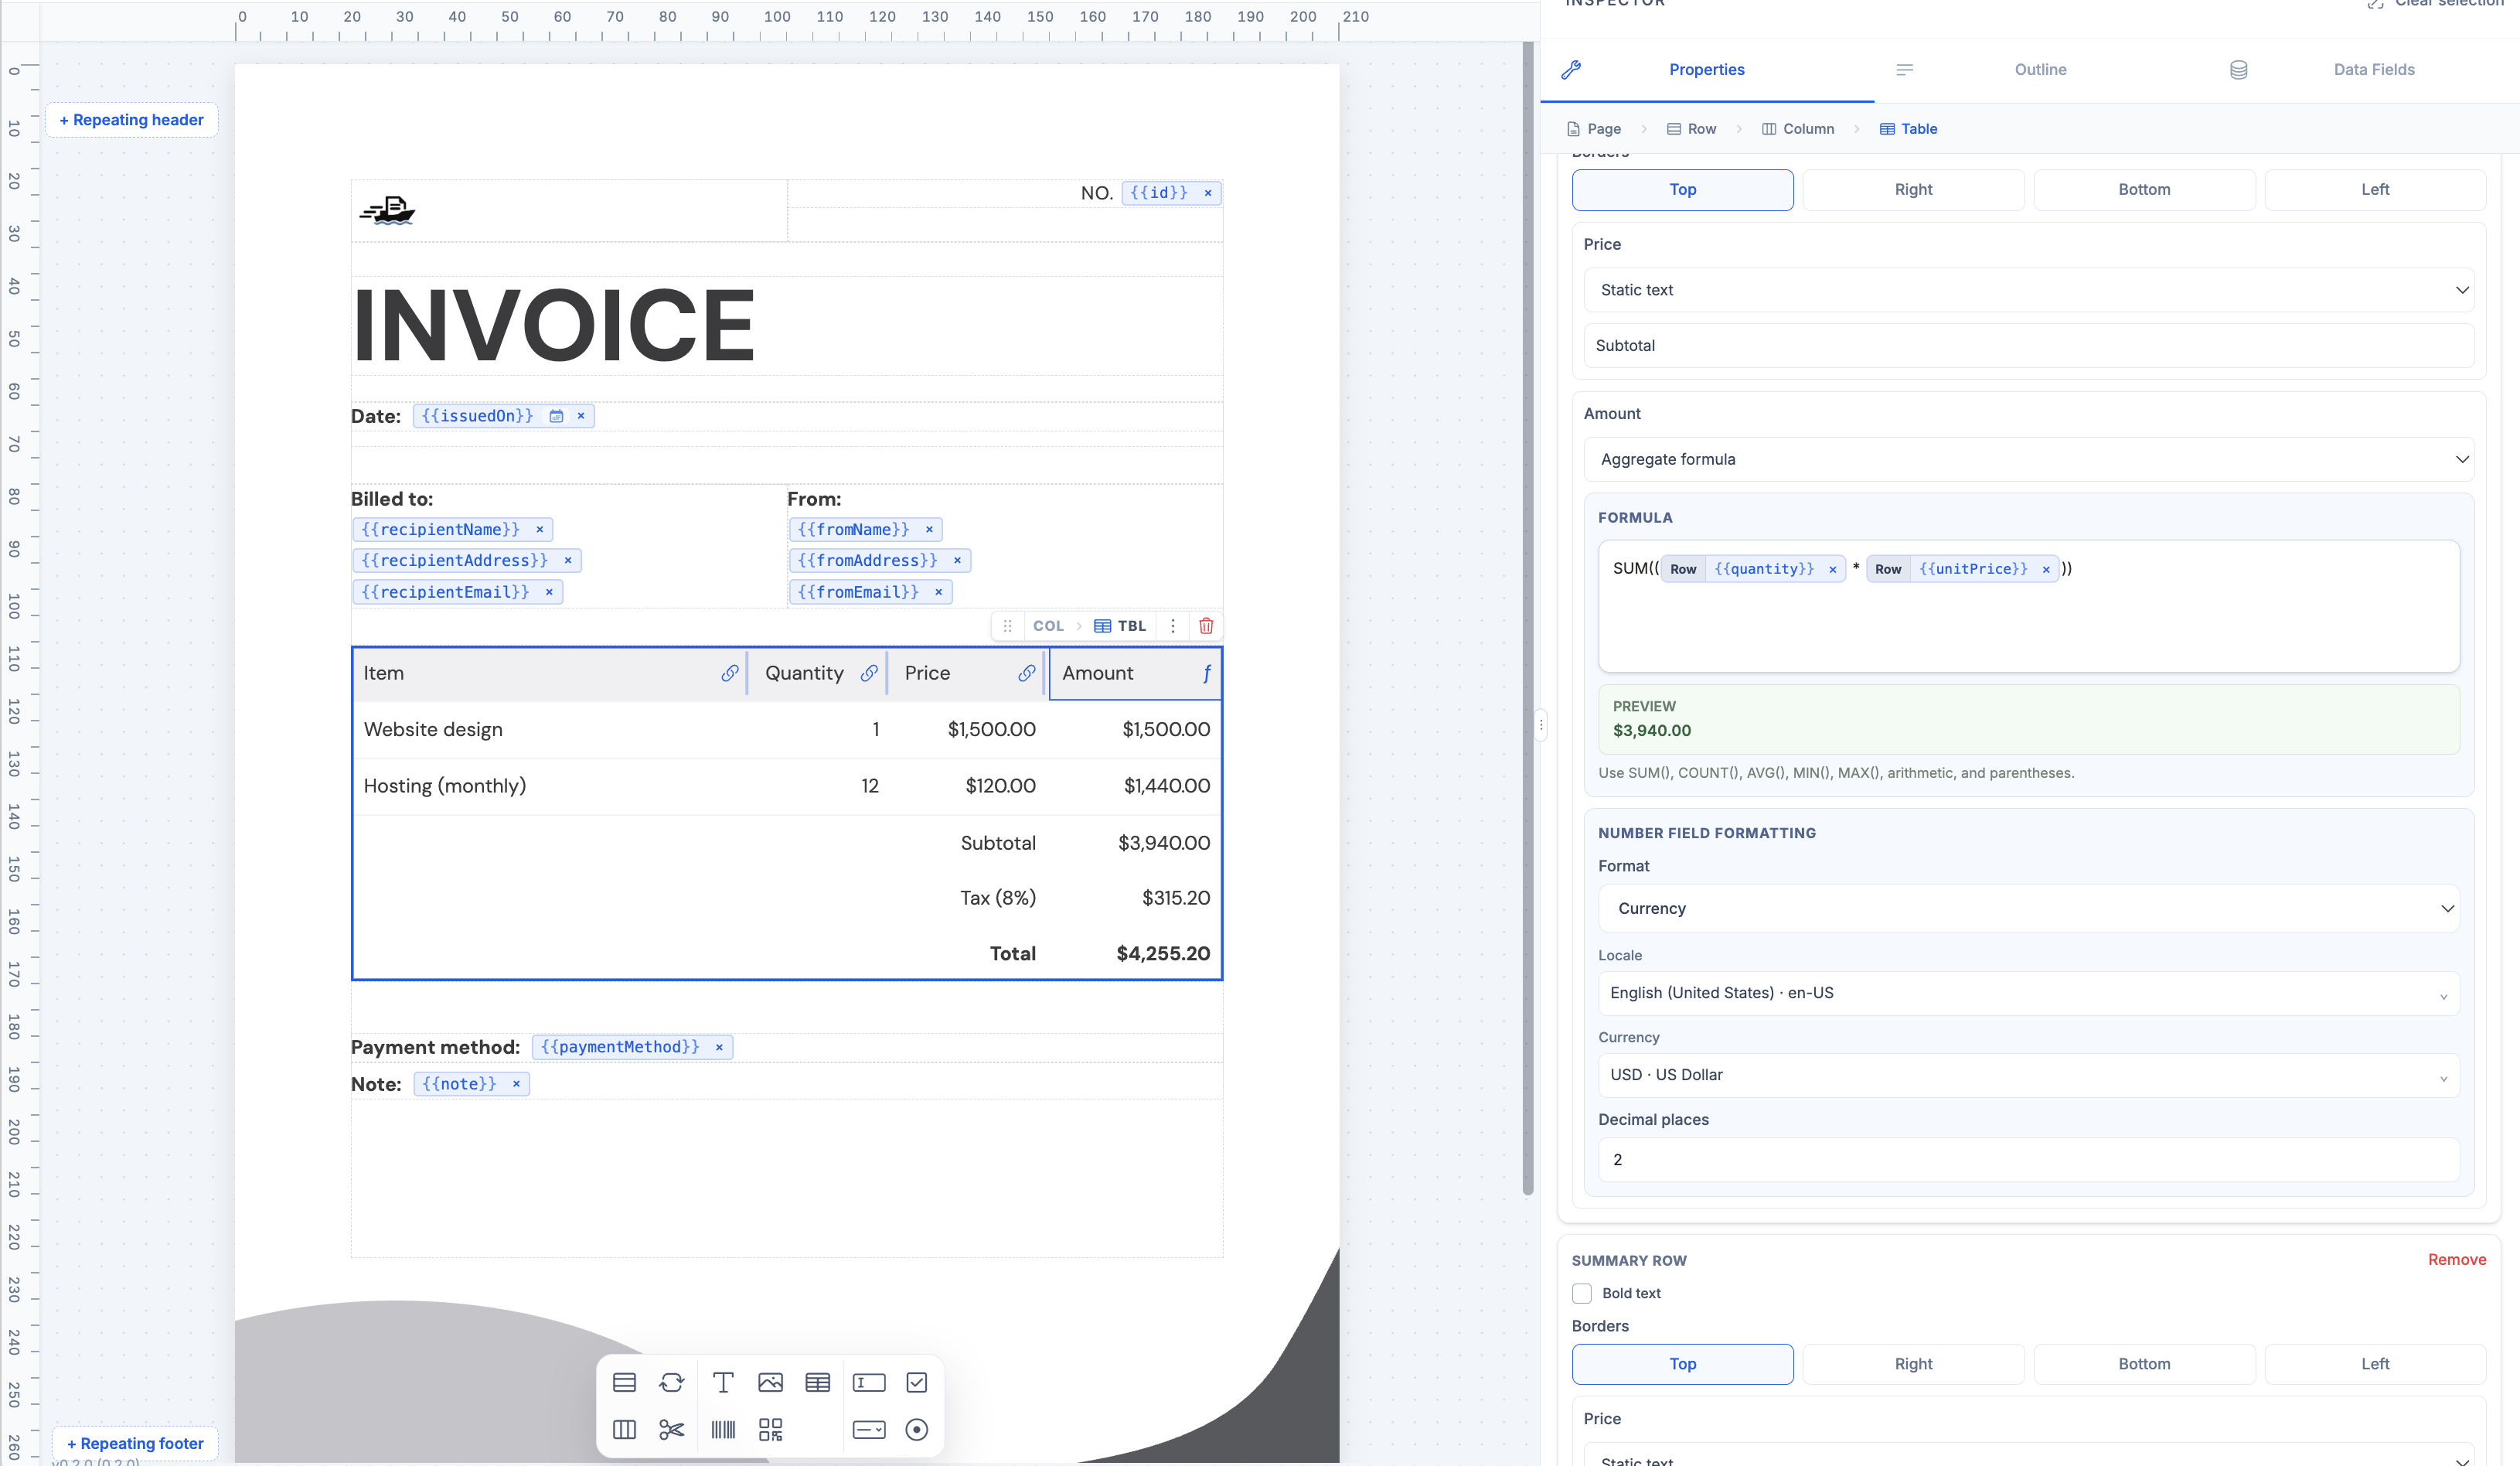
The screenshots use field names such as invoice.issuedOn and unitPrice, while the example JSON above uses issuance_date and unit_price. Use the exact names in your template’s schema when configuring Zite. Ask the assistant to give you that schema along with the template ID so Zite can map the form fields correctly.
Preview, publish, and finish the Zite configuration
Use Preview PDF to check the layout, formatting, and calculations. Also try a long recipient address and enough items to span multiple pages. Once the template is ready, publish it and copy its template ID.
Create an API key for Zite
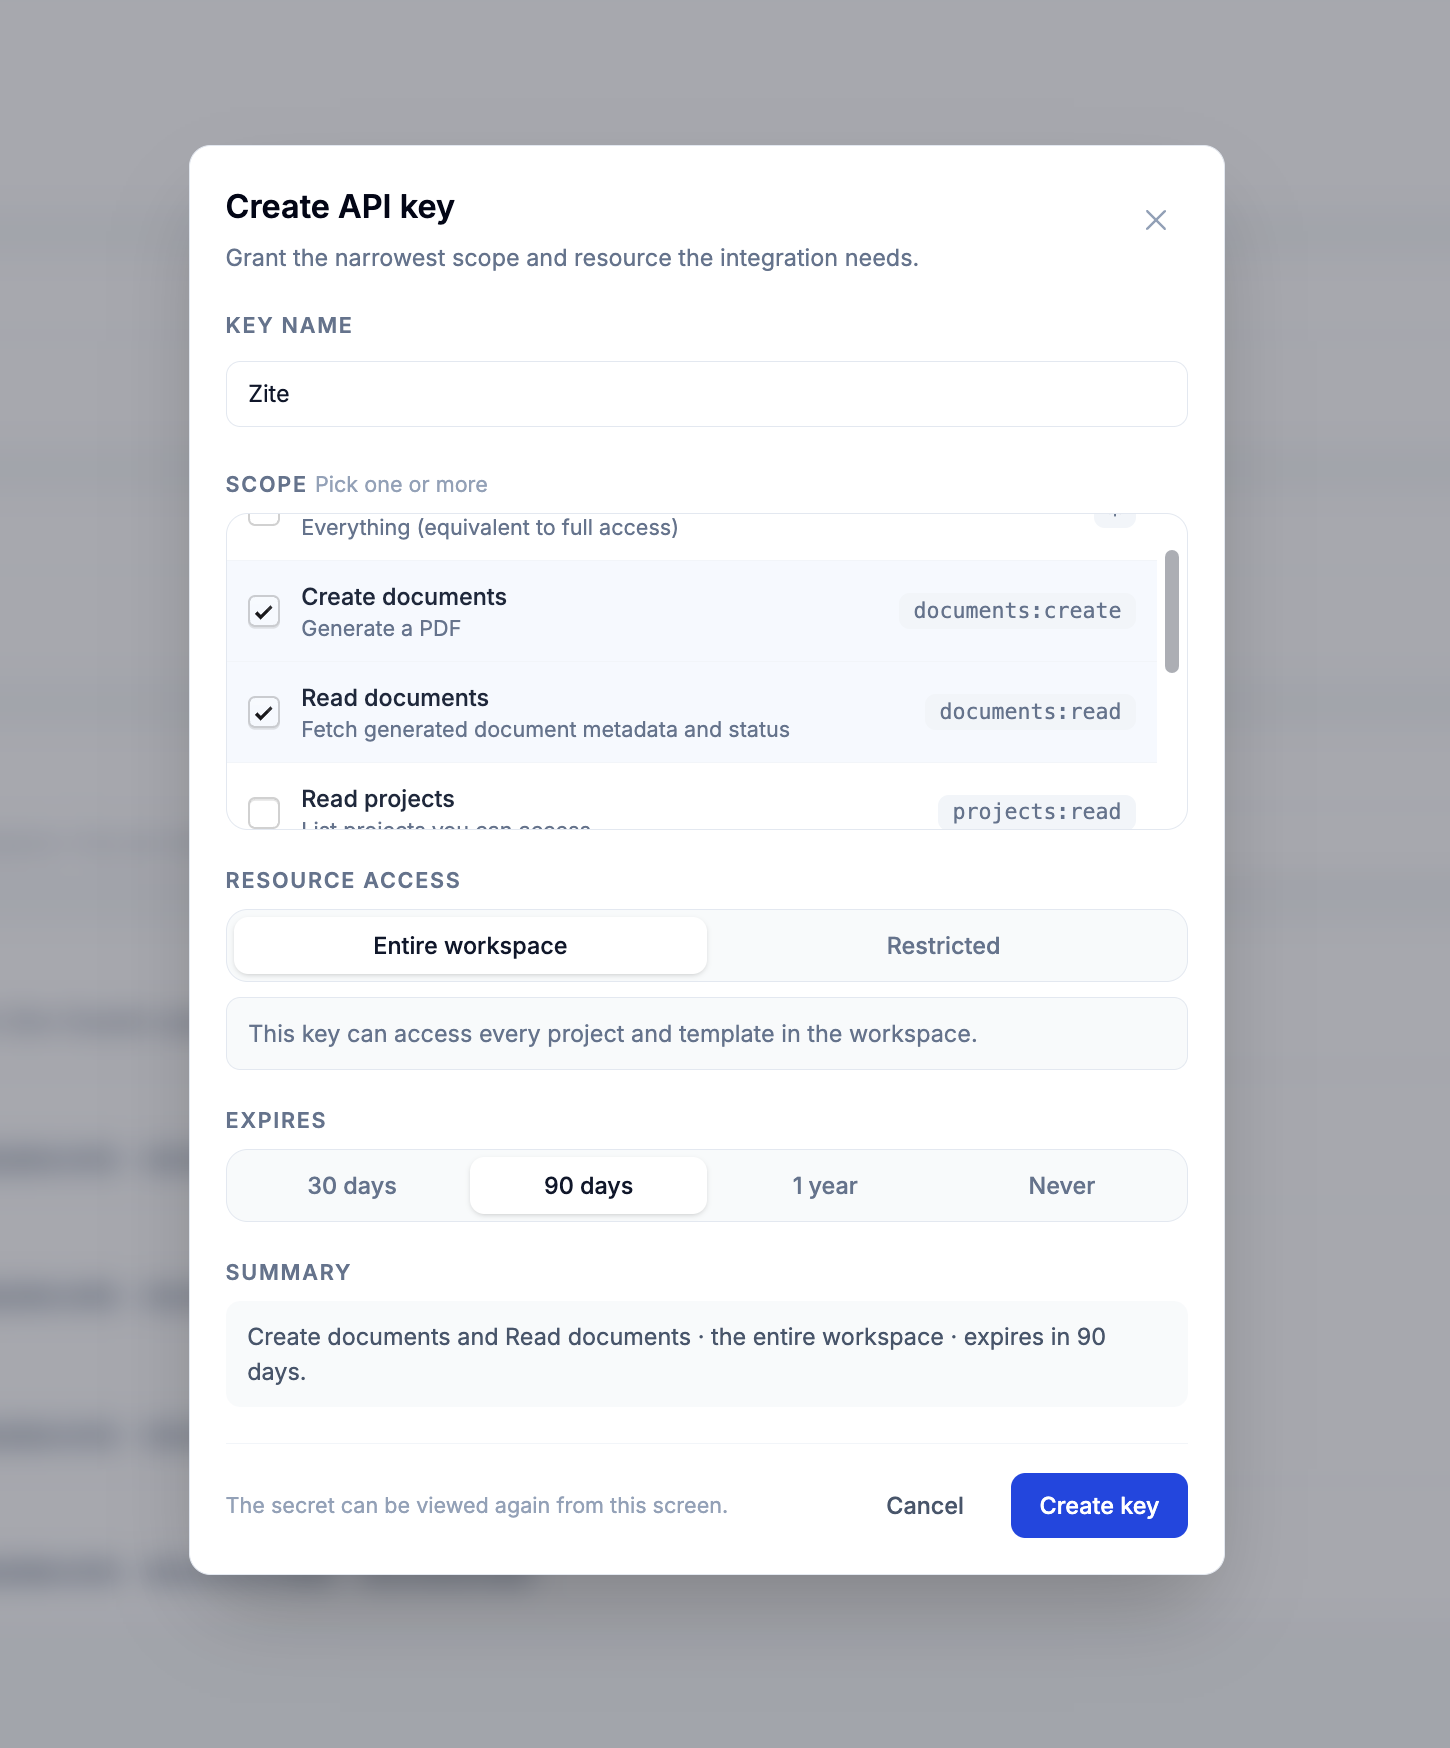
In your ShipPDF workspace, open API keys and choose Create API key. Name it Zite, then select Create documents (documents:create) and Read documents (documents:read). These let Zite generate the invoice and retrieve its status and download URL.
Choose resource access that includes the invoice template and an expiration that fits your integration. The screenshot shows Entire workspace and 90 days. You can choose Restricted to limit the key to the resources Zite needs. Follow the authentication guide for more detail.
Register Zite’s webhook in ShipPDF
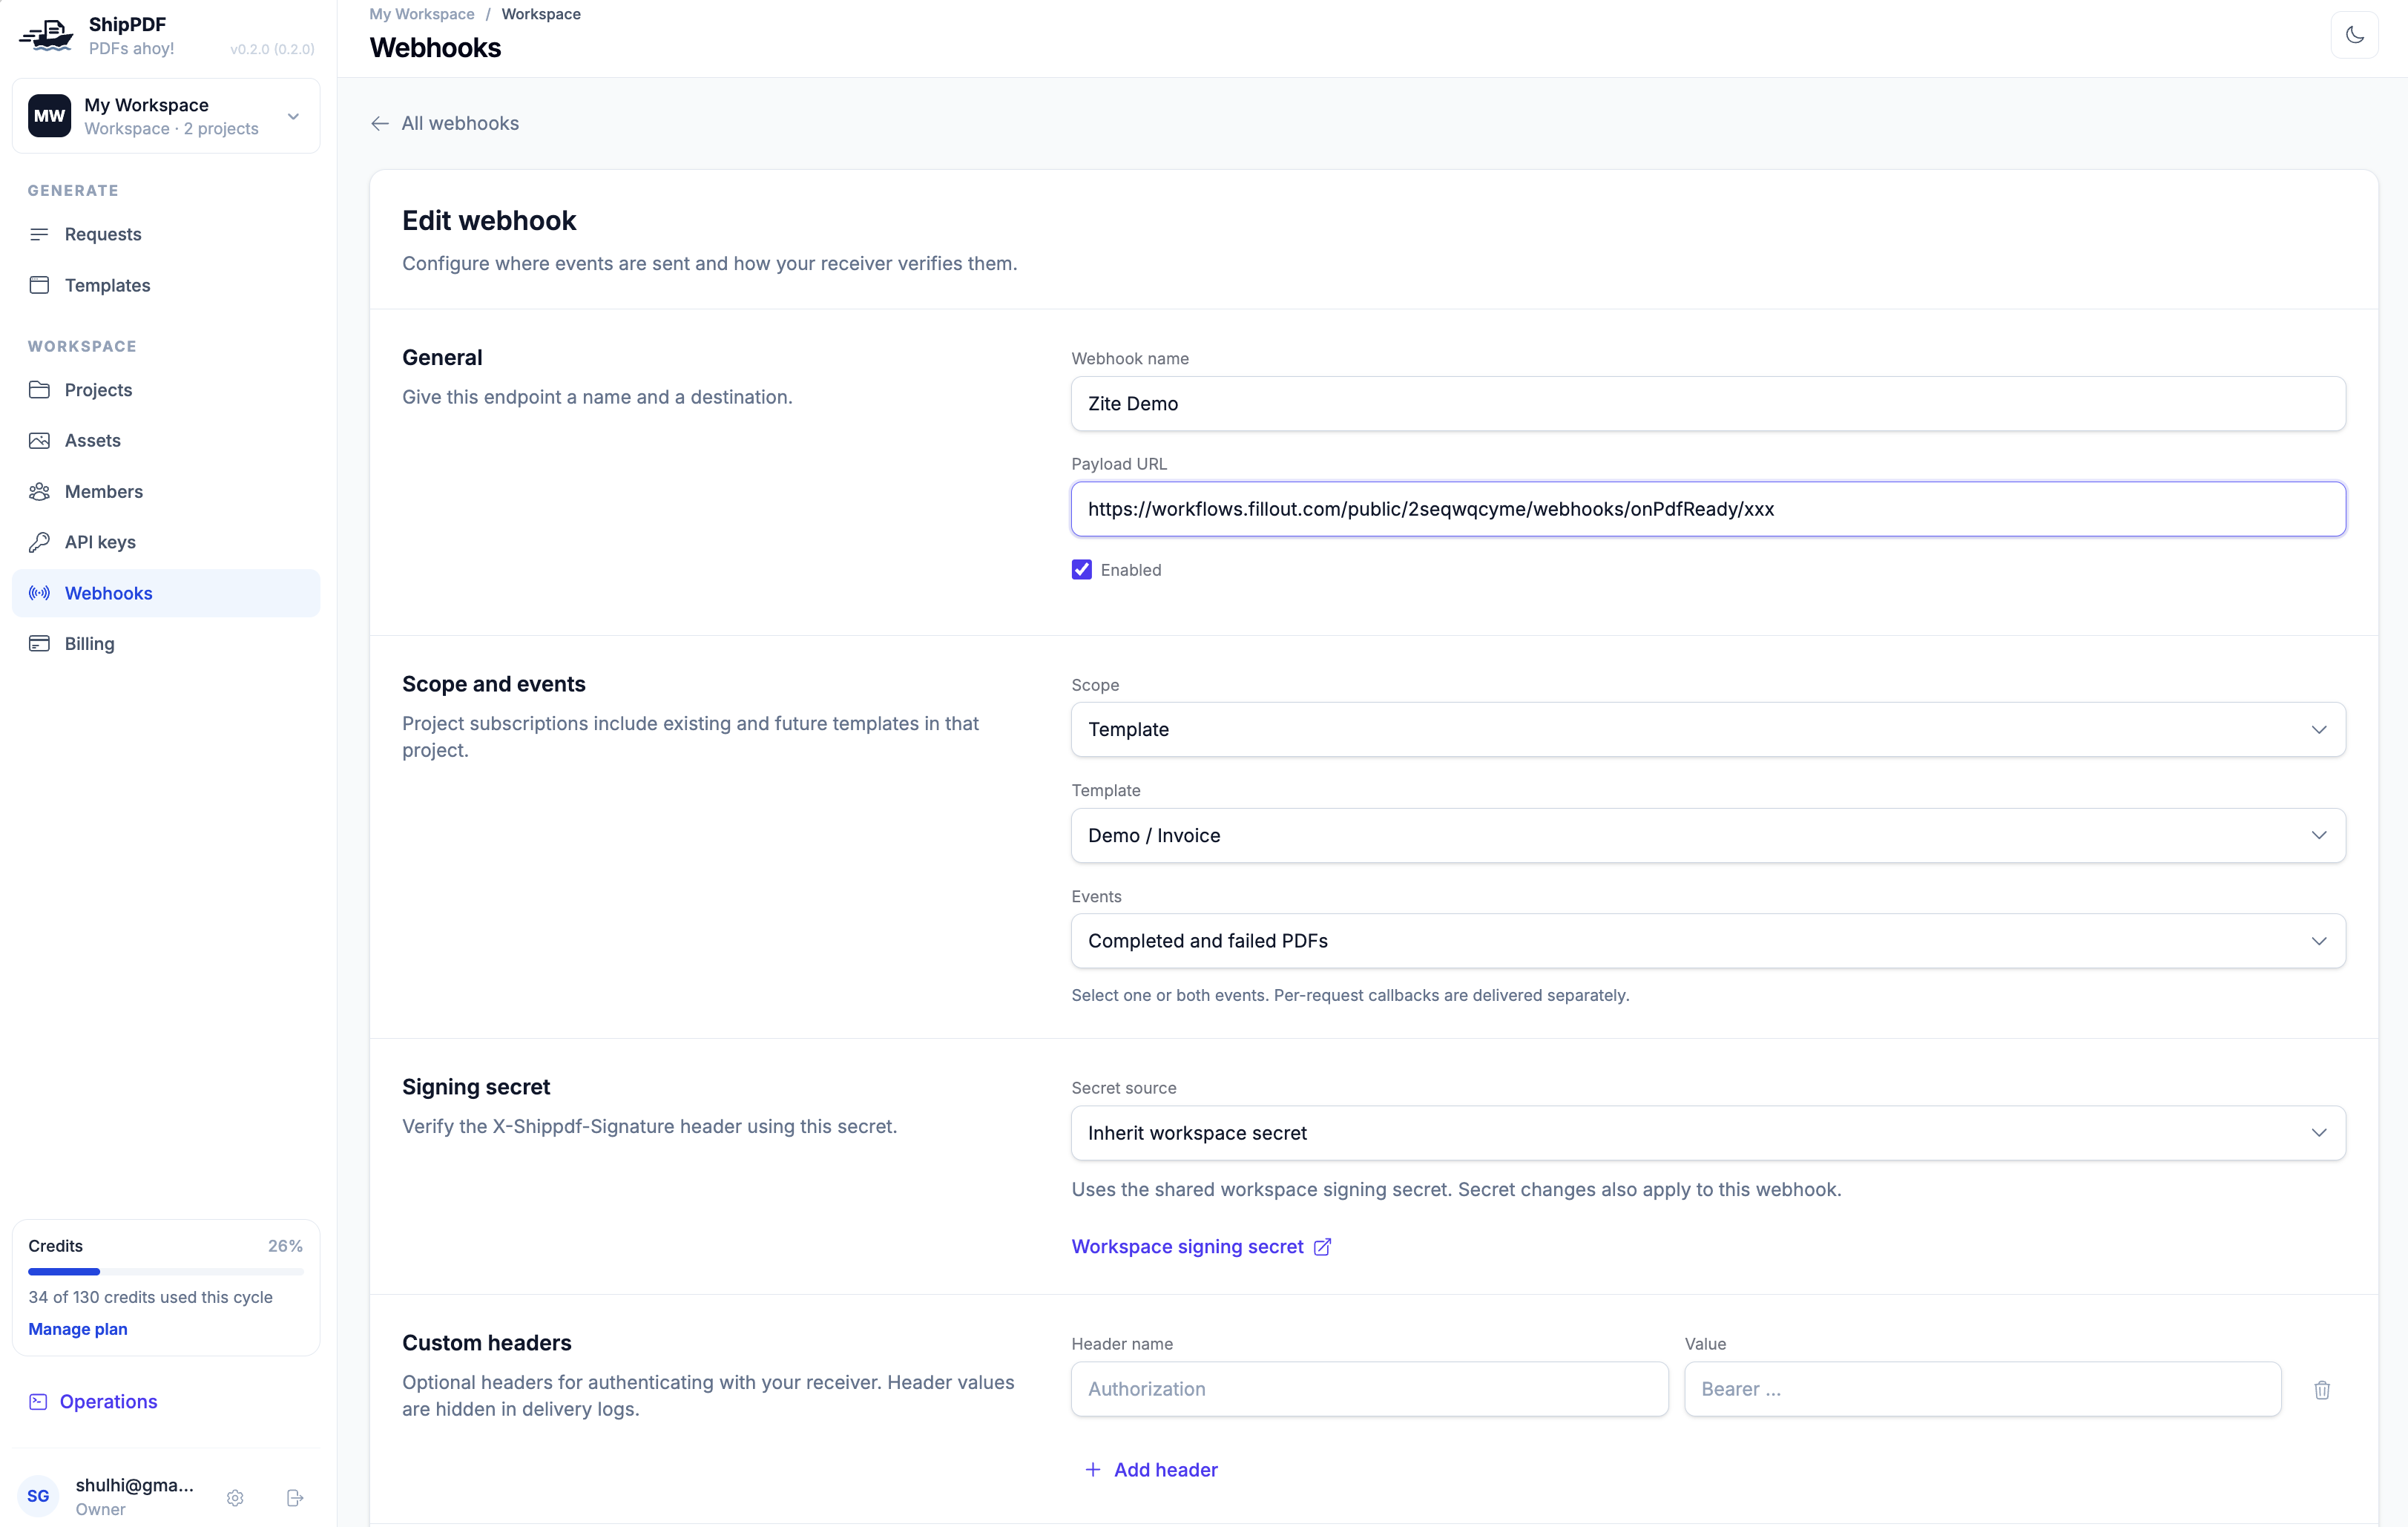
Open Webhooks in your ShipPDF workspace and create a webhook using the endpoint URL Zite gave you. Configure it as shown below:
- Webhook name: a recognizable name such as Zite Demo.
- Payload URL: the HTTPS endpoint from Zite.
- Enabled: checked.
- Scope: Template, then choose your invoice template. In this example, it’s Demo / Invoice.
- Events: Completed and failed PDFs, so Zite receives both outcomes.
- Signing secret: Inherit workspace secret, as shown. Configure Zite to verify the signature with that secret, or verify the saved document through the authenticated API as described in the earlier prompt.
Save the webhook. ShipPDF will send matching invoice-generation events to this endpoint whenever the template is used. This is the easier setup for this tutorial: the destination is configured once in ShipPDF, and Zite’s generation requests only need the template, data, and record metadata.
ShipPDF also supports a per-request callback through webhook_url. With that approach, Zite must include the URL in each generation request. We’re using the saved template webhook here, so leave that field out to avoid sending the same event to this endpoint twice.
Return to Zite and provide the published template ID, your template’s exact data schema, and the API token through its secret setup. Ask Zite to finish the field mapping using the API reference. Confirm that you’ve registered the webhook in ShipPDF. The generation request should contain template_id, data, and metadata.
5. Publish Zite and test a complete invoice
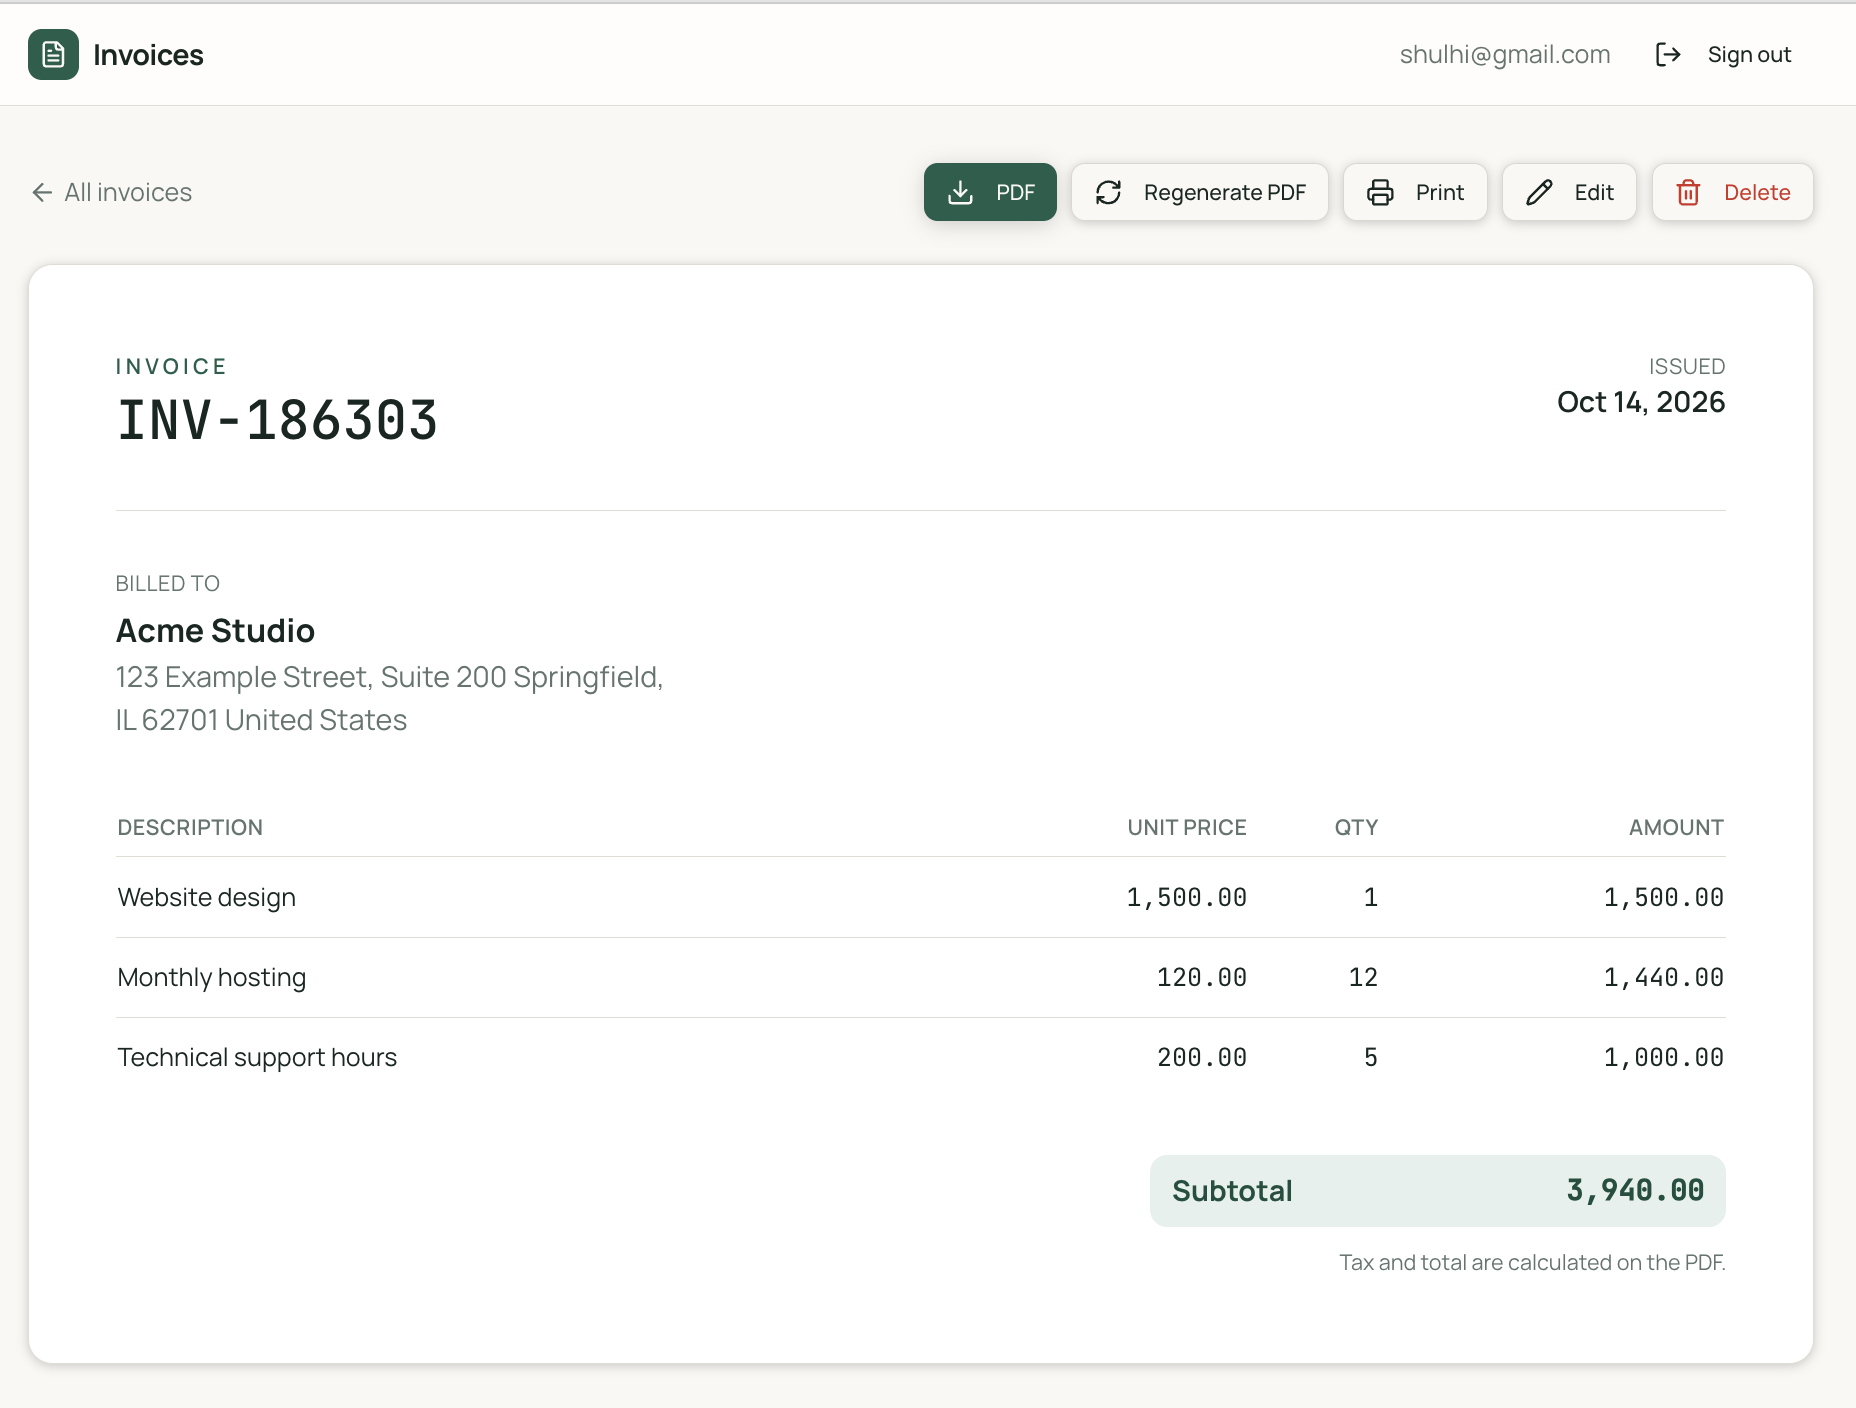
Publish the Zite app and open its published URL. Fill in the invoice details and add your line items. For this test, we entered invoice INV-186303, dated October 14, 2026, for Acme Studio. Its three items produce a subtotal of 3,940.00.
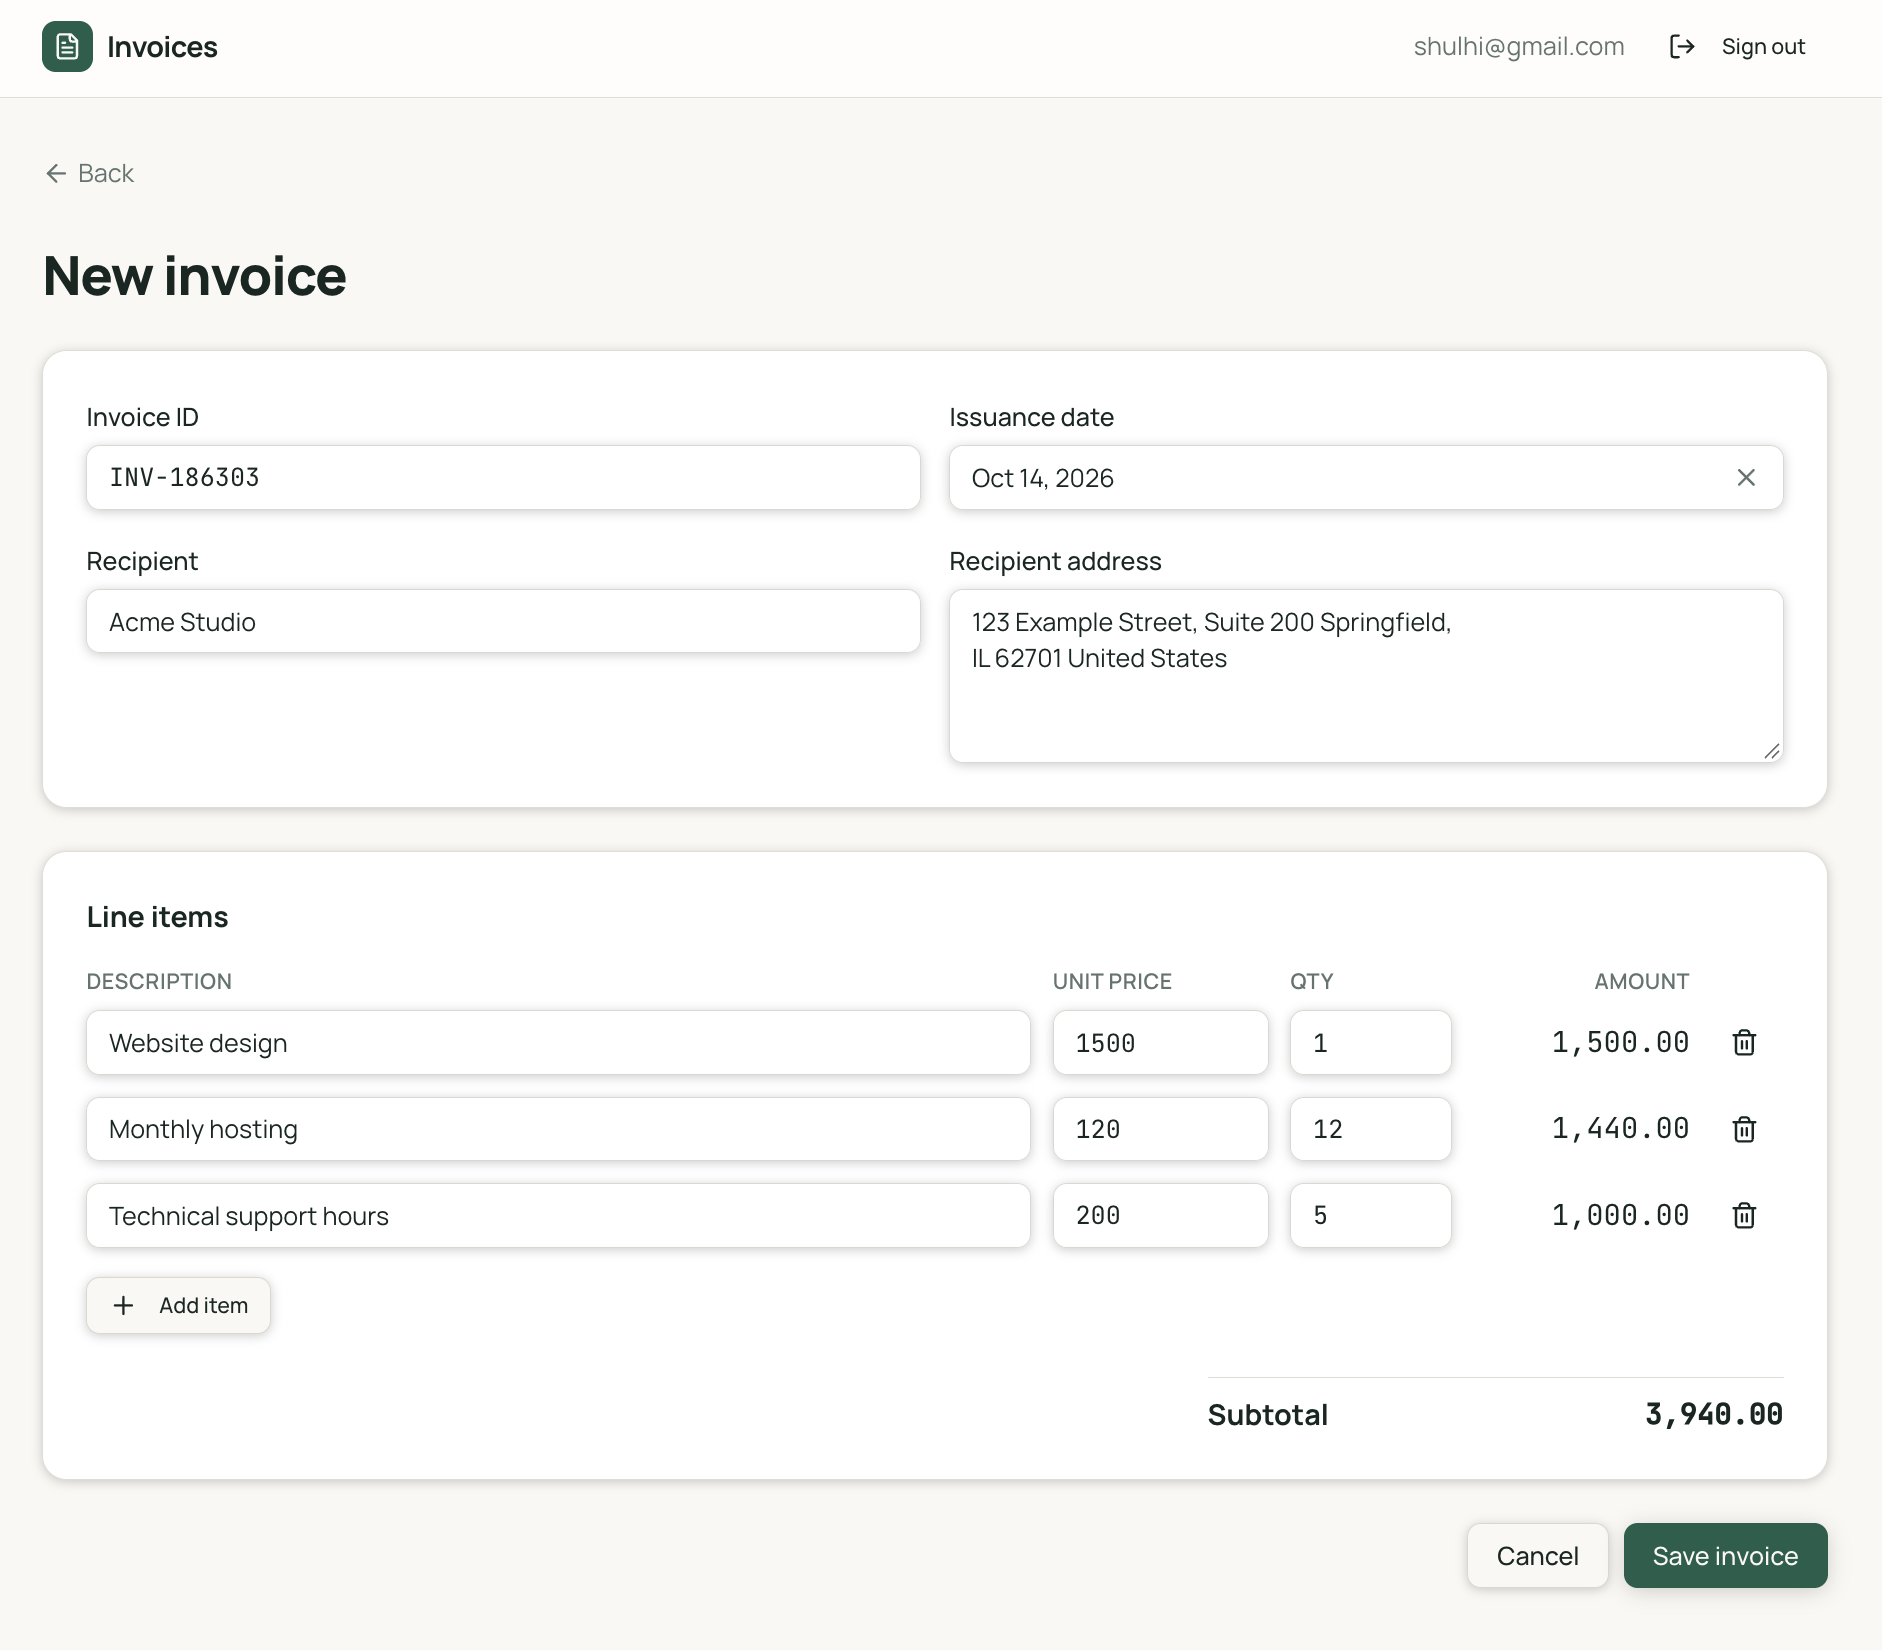
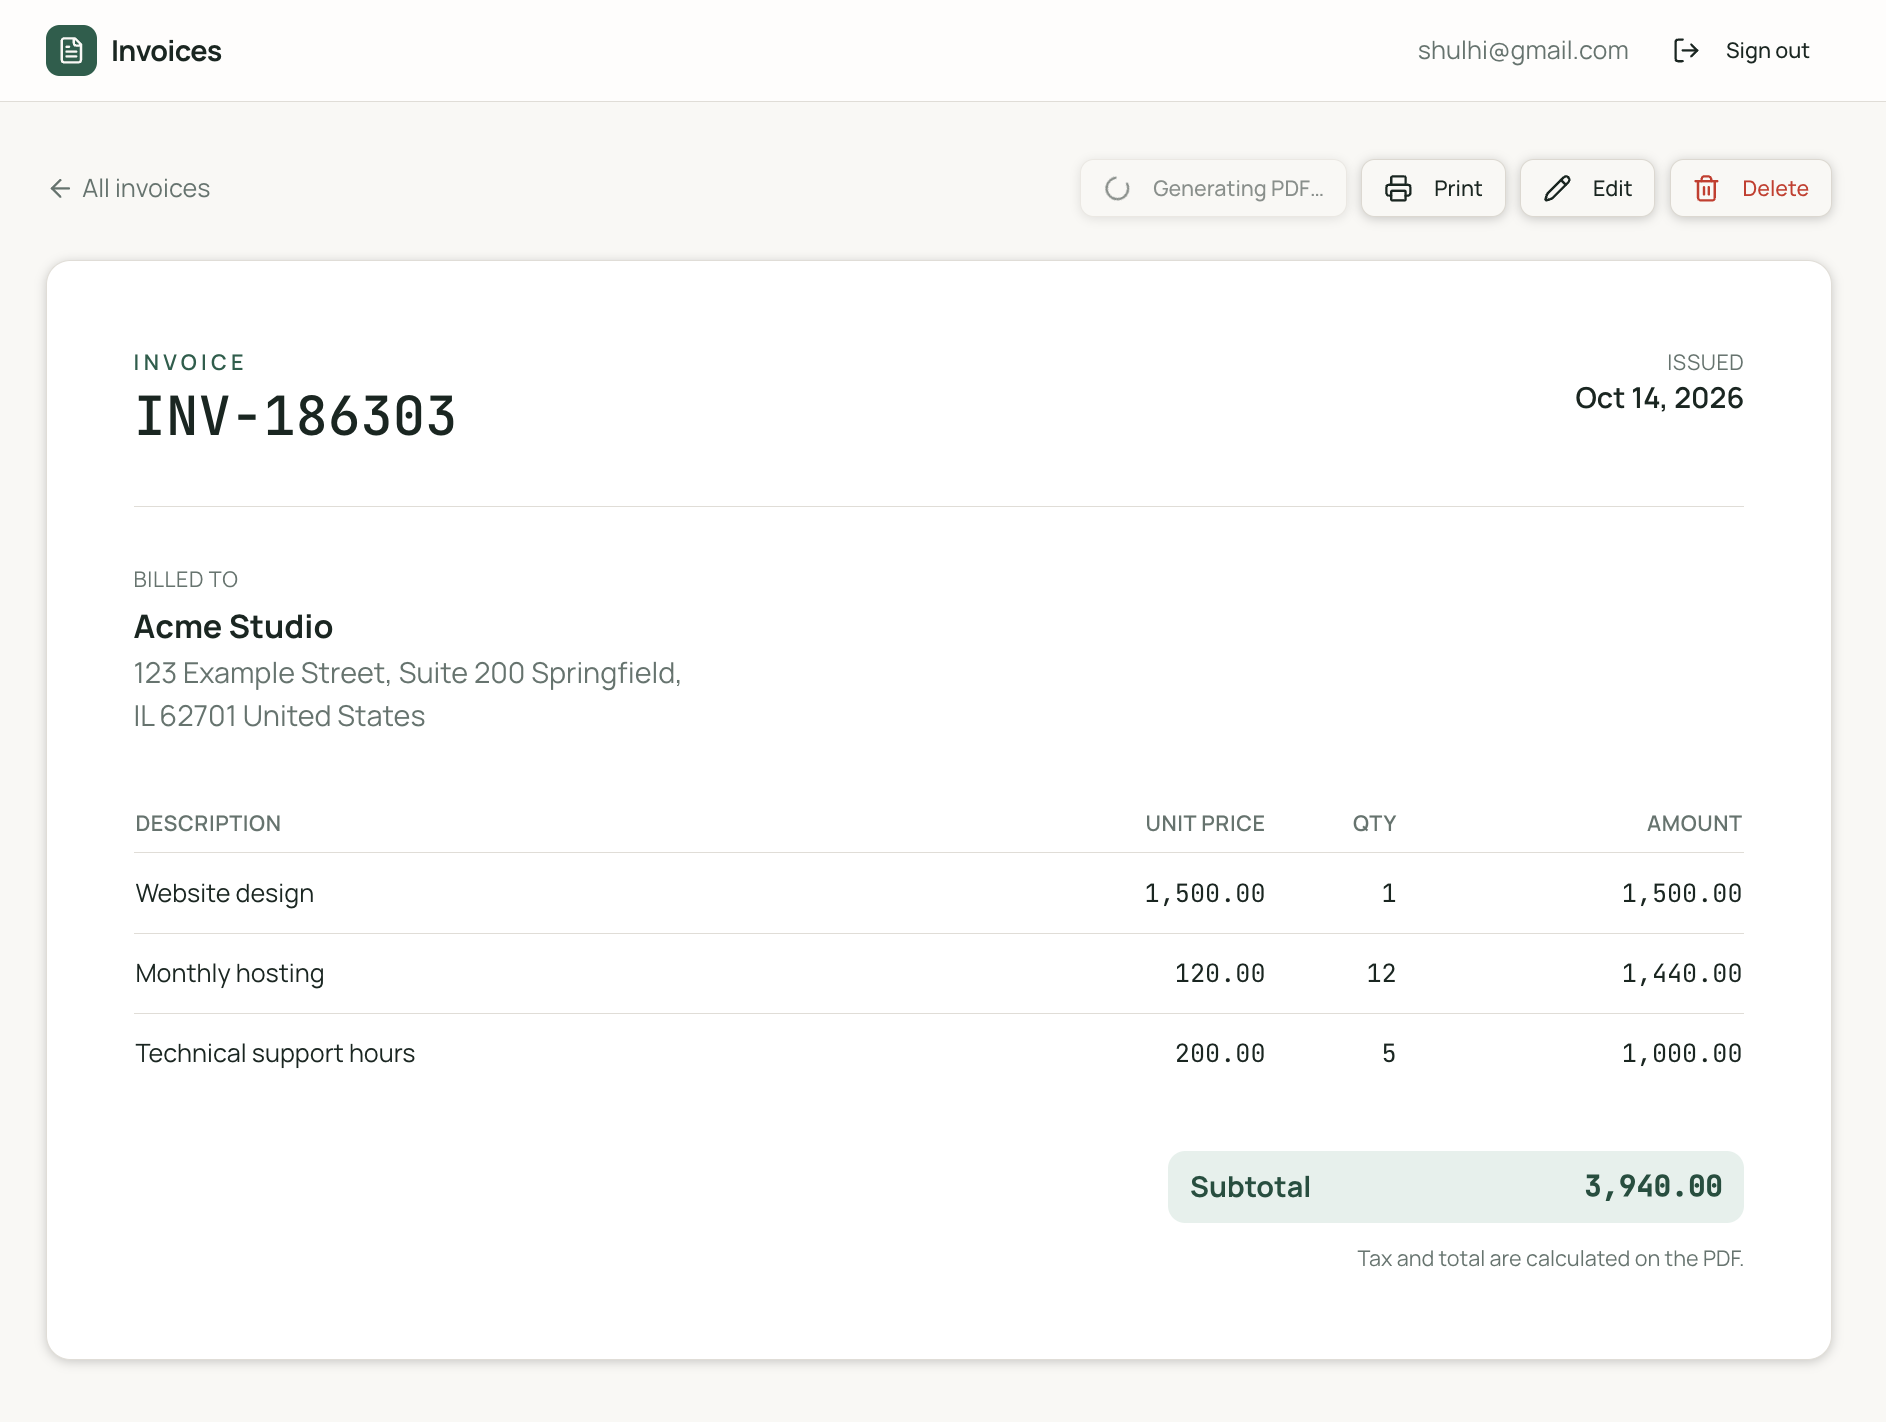
Click Save invoice. Zite saves the record and opens the invoice page. While the PDF is being generated, the download action shows Generating PDF…. In this version, Zite displays the subtotal, while tax and the final total are calculated in the PDF template.
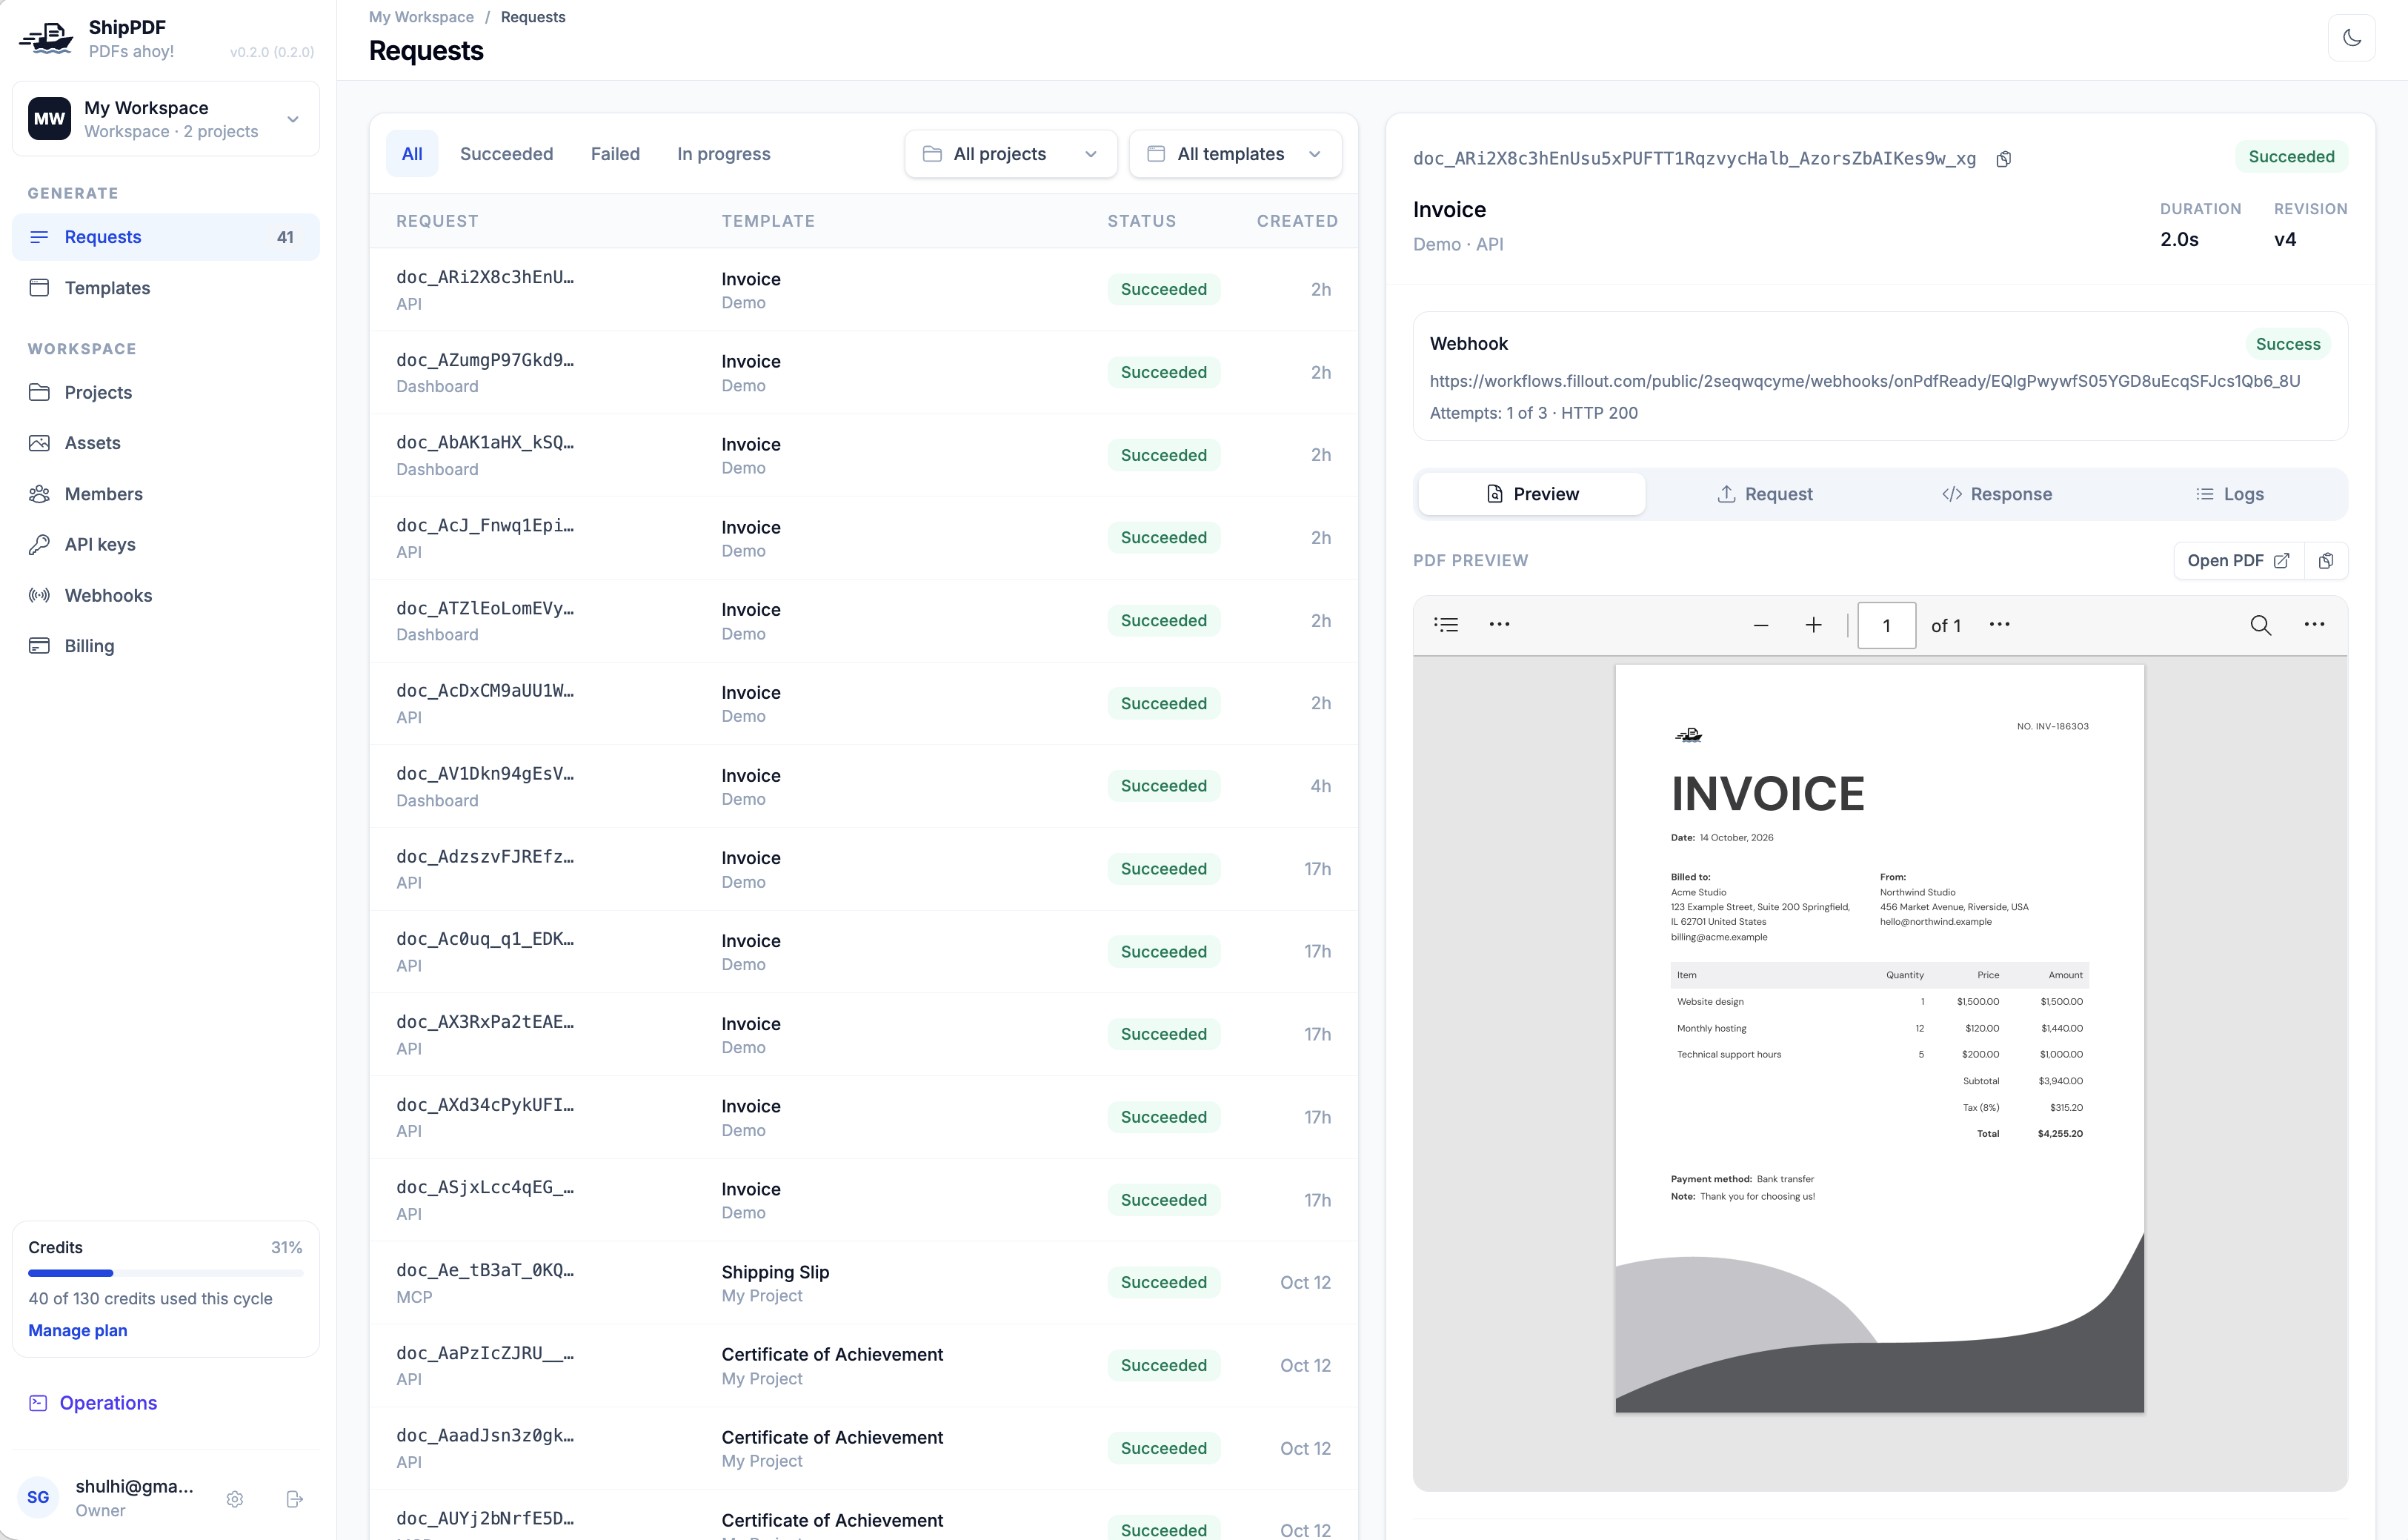
In ShipPDF, open Requests and select the invoice’s API request. The request below shows Succeeded, with the generated invoice visible in Preview. Its Webhook panel also shows Success and HTTP 200, confirming that Zite’s endpoint received and acknowledged the notification. You can inspect the Request, Response, and Logs tabs when troubleshooting.
Check the rest of the workflow:
- The invoice and its line items are saved in Zite.
- The generation appears in ShipPDF under Requests with Succeeded status.
- Zite receives the callback and associates it with the correct invoice.
- The PDF is downloaded and uploaded to the invoice’s PDF field. If you’re using the version shown in our screenshot, open the invoice to trigger this step.
- The PDF field contains a document, and the app’s PDF button lets you download it. Check the recipient, date, item amounts, subtotal, tax, and total against the form.
When the document is ready, Generating PDF… becomes a green PDF button. Click PDF to download the generated invoice. The page also includes a Regenerate PDF action.
In Zite’s Invoices table, the same record now has a file in its PDF field and a Ready status. This confirms that Zite saved the document as an attachment.

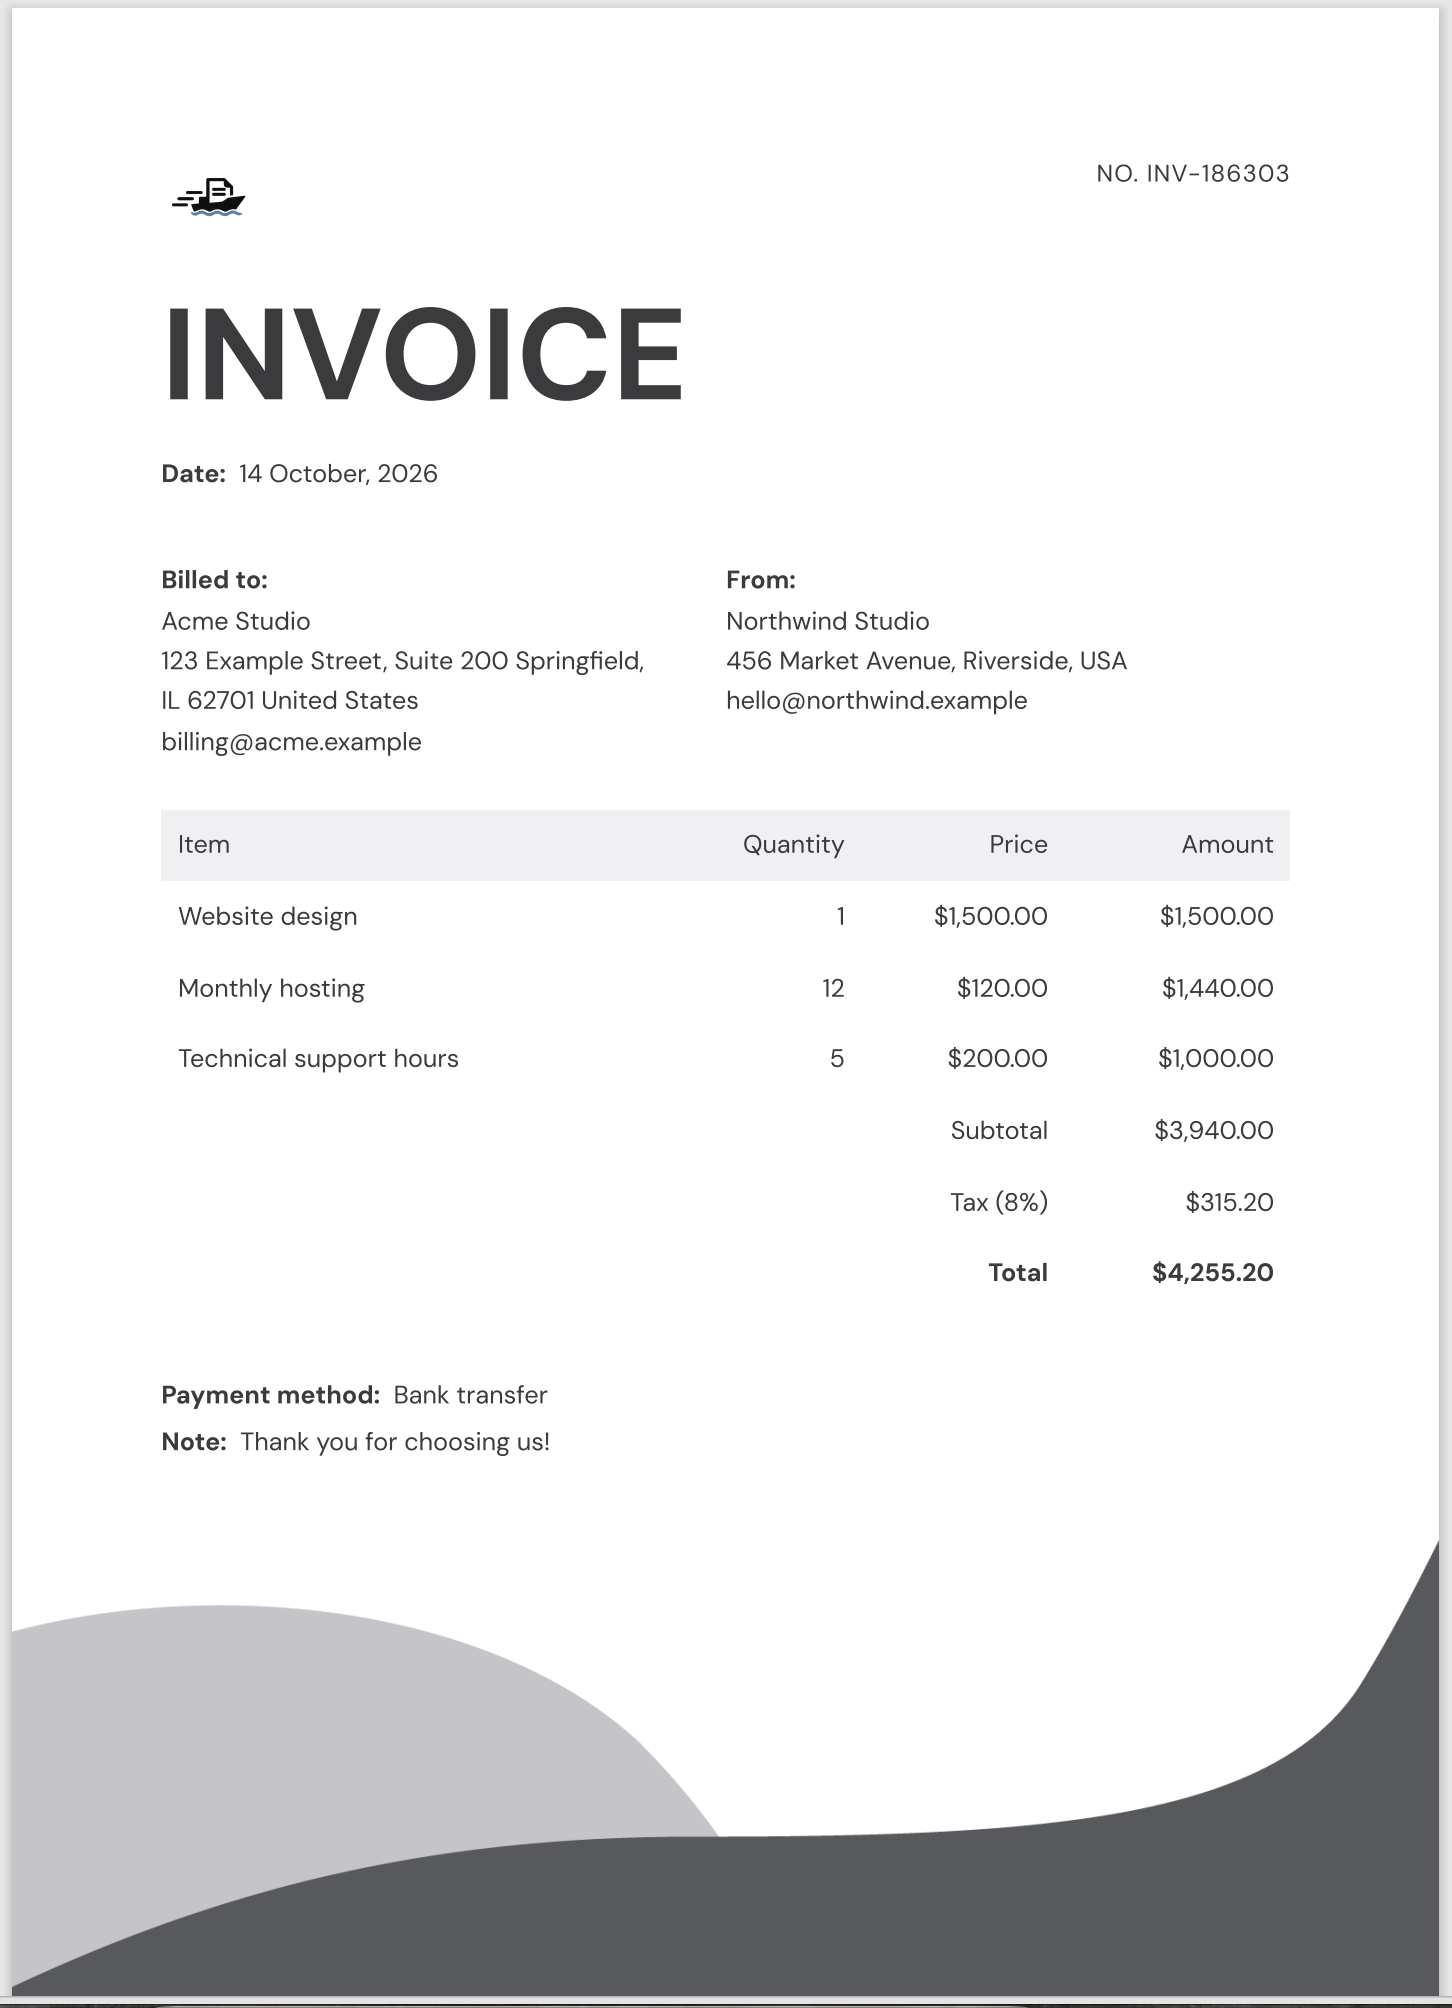
The downloaded PDF uses the template we designed with AI and refined in ShipPDF. It shows the formatted date and currency, plus the calculated subtotal, tax, and total. For this invoice, the subtotal is $3,940.00, tax at 8% is $315.20, and the total is $4,255.20. Those tax and total values are calculated in the template, even though their database columns are empty in the Zite screenshot.
If you configured automatic file saving, repeat the test without opening the invoice page. Confirm that the PDF field fills from the backend workflow alone.
Troubleshooting your Zite invoice PDF
ShipPDF generated the PDF, but Zite’s PDF field is empty
Check the download and upload step. A completed generation doesn’t guarantee that Zite has stored the file. In the screenshot’s implementation, the save starts only when the invoice is opened. Also check for an expired URL or a failed upload, and ask Zite to expose file-saving errors.
The PDF download link has expired
Fetch the existing document using its saved ShipPDF document ID to get a fresh URL, then retry downloading and uploading the file. You don’t need to generate the invoice again just to refresh the URL.
Dates or currency look wrong
Check the field types and binding formats in ShipPDF. Send 500 as a number, rather than "$500.00", and send a date such as "2026-10-13". Choose the locale, currency code, decimal places, and date pattern in the template.
The totals don’t match the Zite form
Check that both sides use the same quantities, prices, tax convention, and rounding rules. These formulas expect 6 for a 6% tax rate and divide it by 100. Confirm that Zite includes the tax rate in every line item.
Zite invoice template FAQ
Can I customize a Zite PDF template without ShipPDF?
Yes. Zite supports PDF generation and you can ask its AI to customize the template. ShipPDF is useful when you want a dedicated visual editor alongside AI editing, with reusable formatting and formula settings.
Does this change my Zite invoice form?
The form stays in Zite. You customize the PDF layout in ShipPDF and configure Zite to send the invoice data to that template.
Do I need database columns for subtotal and total?
You don’t need to pass calculated subtotal and total fields just to display them in the ShipPDF document. Keep calculated columns in Zite if you also need them for app views, reporting, or other workflows.
Should I give Zite the ShipPDF API reference?
Yes. Include https://shippdf.com/docs/api/ in the integration prompt so Zite can follow the documented endpoints, authentication, request fields, and webhook behavior.
Should I store the ShipPDF PDF URL in Zite?
Store the downloaded PDF file in the invoice’s file field. Keep the ShipPDF document ID for lookup and retries. The signed PDF URL expires, so it should be used to retrieve the file rather than serve as the permanent attachment.
Customize your next Zite invoice
Start with your invoice form in Zite, then build the document in ShipPDF. Use AI for the initial template, refine the layout in the editor, and configure dates, currency, and formulas once for future invoices.
Create your ShipPDF account and use the API reference when asking Zite to connect your app.
← Back to blog